https://larougetdelisle.com/blogs/doll-tips-and-tutorials.atom larougetdelisle - Doll Tips & Tutorials 2022-11-09T11:44:37-08:00 larougetdelisle https://larougetdelisle.com/blogs/doll-tips-and-tutorials/8333516-18-doll-swimsuit-cover-up 2022-06-20T18:00:00-07:00 2022-11-04T07:40:45-07:00 18" Doll Swimsuit Cover-up Free Tutorial Melinda Schlimmer

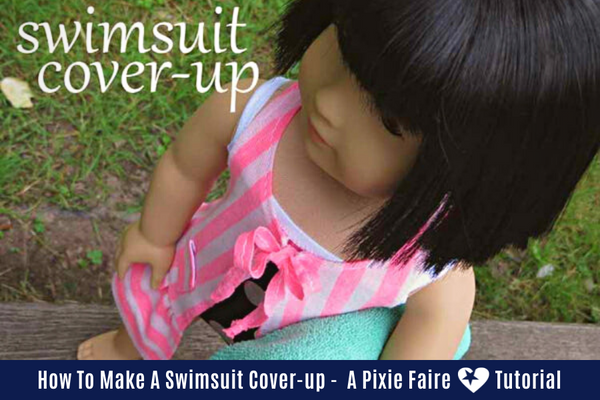
Make this cute swimsuit cover-up to help beat the summer heat!

More

]]>

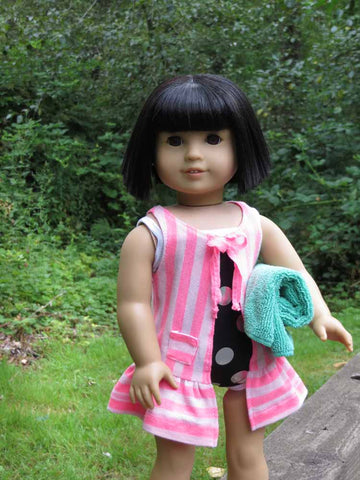
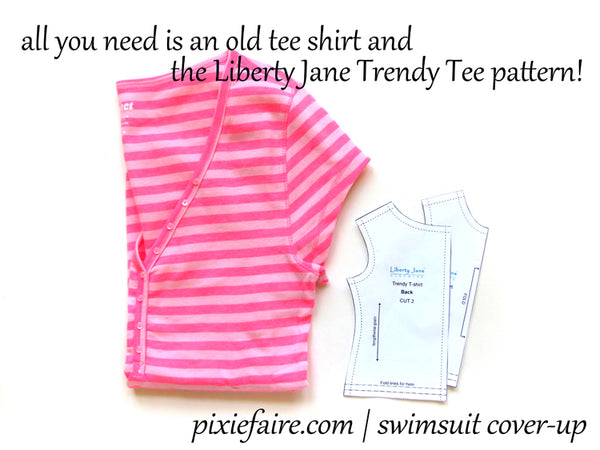
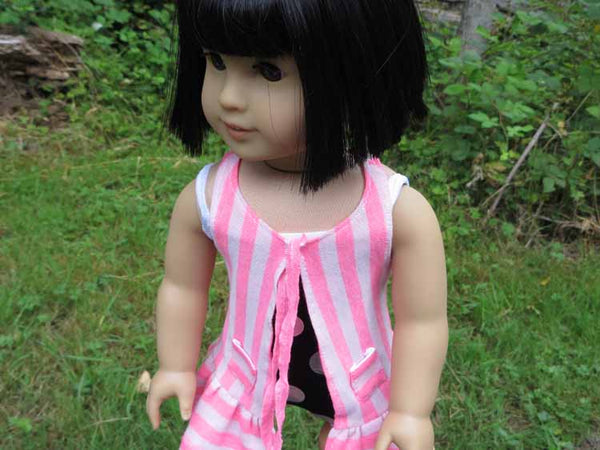
Today's tutorial is a super cute swimsuit cover-up! It features fun racer-back styling, a single tie at the front, and two tiny pockets. And the best part? All you need is an old t-shirt and the (free!) Liberty Jane Trendy T-Shirt pattern.


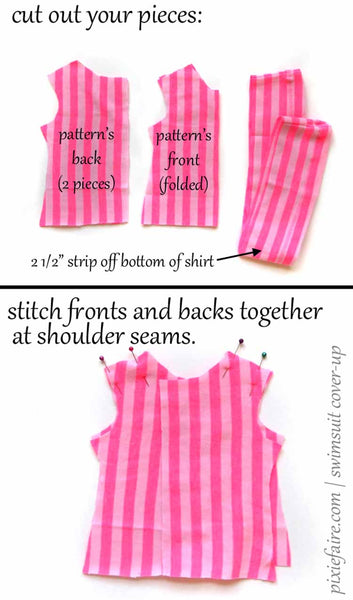
Cut a 2 1/2" wide strip off the bottom of your t-shirt, including the original hem, then cut out the fronts and backs as the pattern directs (you don't need the sleeves). The finished cover-up will open in the front, so for our purposes, we'll pretend the back is the front, and the front is the back. Got it? Let's go!

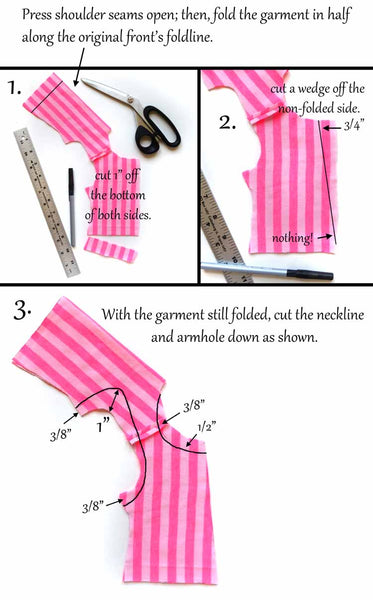
Next, we'll do some fancy trimming. Open up the shirt, and then refold it along the original front's foldline. Lay the two 'backs' (what will become our fronts) on top of each other, being careful to line everything up. You'll make three sets of cuts; refer to the picture below to see how big and where to make them.

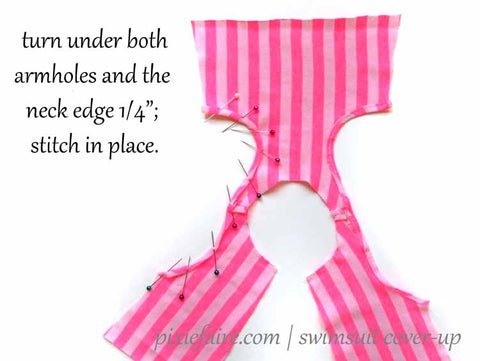
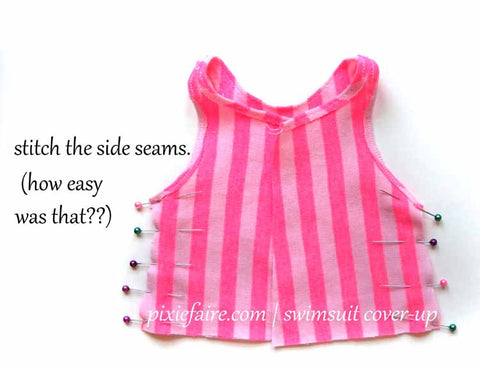
Then, re-open the top, and hem both armholes and the neckline. Once that's done, sew the side seams!


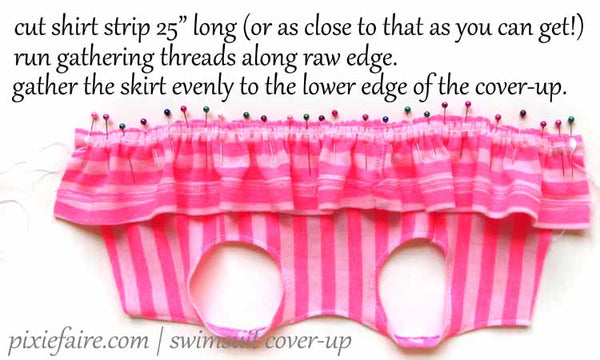
Next, take the 2 1/2" strip you cut off the bottom of the shirt. If you used the shirt's hemline, you can save yourself a step, like I did here; otherwise, take a minute and run a narrow hem along one long edge. Cut the strip so that it's 25" long -- or as close to that as you can get with your tee.

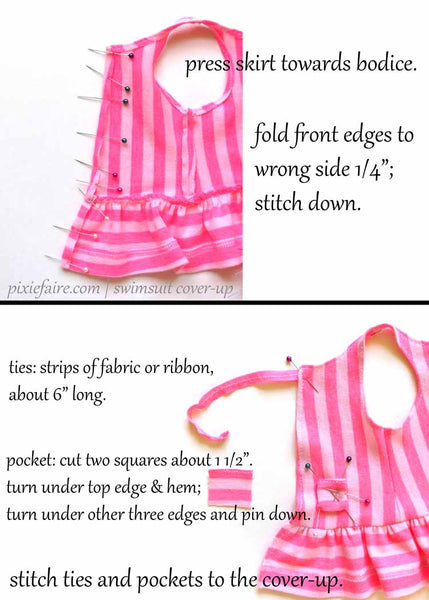
Finally, hem the front edges and add the ties and pockets.

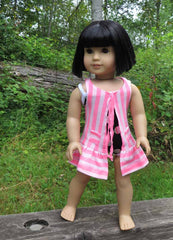
Then, put it on your doll and let her have a blast!


Happy summer!

Melinda, for larougetdelisle

PS: Does your doll need a new swimsuit to go with her cover-up? Liberty Jane has a free swimsuit pattern too!


ENTER TO WIN A $50 larougetdelisle Gift Card!


To enter this week's contest, simply click the link below and then enter through the giveaway widget at the bottom of the blog post, there are many things you can do to earn multiple entry points!

Contest Details: You enter through the entry form that is embedded on this page and appears just below this paragraph, if you don't see it, be sure to visit the page from your desktop or an alternate browser such as Google Chrome. It may not appear on all mobile devices. The complete rules and entry details appear on the entry form. This is not a comment contest - in other words, leaving a comment on the bottom of this page is not an official entry method. The only required entry method is to leave a comment under this post and then confirm that you did it in the contest widget. One person will receive the larougetdelisle Gift Card. You can enter once, or gain multiple entries by completing the other entry methods and increase your chances of winning. Please review all Terms and Conditions on the giveaway page before entering. While we wish we could run this contest everywhere, for legal reasons it is only open to eligible residents of the U.S. and Canada, not including Rhode Island. This contest is exclusively endorsed by Liberty Jane Clothing and larougetdelisle. 

Not affiliated or endorsed by Mattel® or American Girl®

a Rafflecopter giveaway


Commenting below and confirming your entry in the widget above gives you one entry method, the other methods are listed in the widget above, be sure to enter in as many ways as you can to receive the maximum amount of entries to win the gift card!

 (This post and giveaway are not endorsed or affiliated with American Girl®, no endorsement implied.) 

We’d love to hear from you. Please leave a comment and tell us,  What is you favorite thing about summer?


]]>
https://larougetdelisle.com/blogs/doll-tips-and-tutorials/how-to-make-a-bean-bag-chair-for-dolls-of-all-sizes 2021-02-16T08:04:58-08:00 2021-04-29T21:02:32-07:00 How To Make A Bean Bag Chair For Dolls of All Sizes Cinnamon Miles Are you looking for something new for your doll room décor? One of the coolest trends from the 80s to modern day is a bean bag chair. They are easy to make and are actually kind of unexpected in doll houses, so it’s a fun wat to add a unique pop of personality to her space.

More

]]>
 

Are you looking for something new for your doll room décor? One of the coolest trends from the 80s to modern day is a bean bag chair. They are easy to make and are actually kind of unexpected in doll houses, so it’s a fun way to add a unique pop of personality to her space.

Follow along in this tutorial to learn how to make a bean bag chair for dolls of all sizes! These are super cute accessories for 18-inch dolls such as American Girl®, 11-. inch fashion dolls like Barbie®, tiny Blythe and Pullip dolls, 14-15 inch dolls such as WellieWishers™ & Ruby Red Fashion Friends, and many more! Posable dolls with more points of articulation are especially fun to poses in the finished bean bag chairs! 

Bonus Giveaway! Scroll down to the bottom of the post for the details and enter to win!

Supplies needed:

  • Something round to trace in proportion to your doll’s size, i.e. a dinner plate, dessert plate, bowl, or cup. It doesn’t have to be dishware, but it does need to be round!
  • Pen or fabric chalk
  • Ruler and/or yardstick
  • Approximately a half yard of woven or stable knit fabric (This depends on your beanbag’s size. For my American Girl doll beanbag, I used half a yard. If you want to go bigger than my measurements you’ll need more; if you go smaller like for Barbie you’ll need less.)
  • Matching thread, hand sewing needle, and sewing machine
  • Stuffing materials: beans or rice for smaller bean bags, packing peanuts and/or plastic grocery bags for larger ones


Please read this tutorial all the way through before starting. I think it will really benefit you to have a start-to-finish understanding of the process before beginning!

Step 1:  Choose your circle size for tracing your top and bottom pattern piece. For my American Girl Doll beanbag I used an 11 ¼ inch diameter dinner plate. For my Barbie beanbag I used a bowl with a 6 inch diameter. Hopefully from those two examples you can determine about what size circle you need. You might need a 9 or 10 inch circle for Ruby Red Fashion Friends and 7-8 inch circle for a Blythe doll.

Step 2:  Determine the height of your beanbag. For my American Girl Doll beanbag I chose to make it 6 inches tall. My Barbie beanbag is 3 ½ inches tall. This measurement is up to you but it usually works out to be a little bit bigger than half the diameter of your circle. We are going to be cutting a long rectangle of fabric that is this wide PLUS an inch, providing for two half inch seam allowances on either side.  (It will make more sense as we go along, but what you are essentially making is a cylinder shape with your circles and long rectangle piece.)

Step 3:  Make sure you have enough fabric. Before I began I scooted my dinner plate all the way over to a far corner of my fabric, which is folded double so there are two layers, so I could make sure I had enough room for my long rectangle of fabric. My 6 inch height plus 1 inch (for two half inch seam allowances) comes to 7 inches. With my plate moved over I did have enough room. Again, if you are making a larger beanbag I would measure this first as you may need more fabric.

Step 4:  Trace your circle onto your fabric, and cut out. For this I needed to flip my wild fabric to the wrong side so I could see my marks better! Using a pen or fabric chalk, trace your circle onto your fabric. Then cut out your circle. The fabric should still be double layer, so you will have two circles.

Step 5:  With your remaining fabric, pen, and yardstick or ruler, you are now going to be marking and cutting out your long rectangle. Measure over from the straight cut edge of the leftover fabric the measurement of your chosen beanbag height plus 1 inch – for me that was 7 inches. Mark a straight line that is this far away from the cut edge, going from the selvedge to the fold. You can see when this is cut out you will have a long rectangle.

*A note about your rectangle length, and a little math: If your circle is as big as mine, and you have a fresh cut of a half yard of fabric and are not using scraps, cutting your rectangle in this way should leave you with plenty of length to make your cylinder. If you are making a smaller beanbag maybe with scrap fabric, or maybe an even bigger beanbag, let me give you a simple way to calculate whether or not you have a long enough rectangle for the circumference of your circle. 

Take your circle and measure the diameter. Again, for me, this was 11 ¼ inches. Now subtract 1 inch from this measurement (for our half inch seam allowance taken from either end of the diameter). Now I have  10 1/4 inches (or 10.25)  as my measurement. This will give you an approximate finished diameter measurement. Now we are going to use some easy algebra. The formula for circumference is π times diameter. So that is 3.14 times your finished diameter measurement. So I multiplied 3.14 times 10.25 and I got 32.185. As a part of this process I always give myself a couple extra inches, so as long as I have about 34 – 35 inches of length for my rectangle, I am all set! Plug in your numbers to calculate how long your rectangle needs to be. 


Step 6:  Let’s get on to sewing this thing! Take your long rectangle piece and make snips all along both long edges. Remember your seam allowance is 1/2 inch, so make these snips only ¼ inch or so. Place one about every inch apart, closer if you are making a smaller bean bag. You are doing this so that you will be able to spread the straight edge out into a curve as you pin it to your curved circle pieces.


Step 7:  Now we are going to pin this straight edge to one of your circle pieces. Start pinning about 1-2 inches into the straight edge of the rectangle piece; do not start right at the beginning. Leave the beginning 1-2 inches loose. Continue pinning around the circle, using your slits to spread out the straight edge to meet the curved edge of the circle piece.

Continue pinning all the way around until you are about 1 inch away from your first pin and stop, leaving a gap between the two pins and then leaving the two ends of your fabric free.


Step 8:  Now you are going to sew around the curve with a half inch seam allowance. Start at your first pin and continue all the way around, bringing the two flaps of fabric together to meet, and stopping your seam right before hitting the spot where you began your seam. The two flaps of fabric should be touching, as in the photo below, but not overlapping. 


Step 9:  Now we are going to partially close the seam in the rectangle, making it into a loop. Lay your work flat and fold your long rectangle piece over itself, lining up the long top and bottom edges. The circle piece you have sewn in will not be able to lay flat at this point, but that’s ok. You are going to sew a short, 1-2 inch seam, perpendicular to the start/stop point of your previous stitching.

Following an imaginary straight line down to the opposite edge, sew another 1-2 inch seam all the way to the bottom edge, thereby leaving an opening. What you have just done is closed the rectangle piece into a circle the right size, but you have also left an opening through which you will stuff the beanbag later.


Leaving about ¾ of an inch in fabric beyond your seams, trim off the excess fabric. You can now open up your bag a little and see the cylinder shape starting to form!


Step 10:  Now take your other circle piece and pin and sew it to the other side of the long rectangle piece, remembering to spread apart your slits as you go. If it ends up being too big or too small, go back and adjust how your slits are spread until it fits better. Stitch all the way around, using a ½ inch seam allowance. You do not need to leave any gaps this time. Once you have done that, you can turn your beanbag right side out!


Step 11:  Now we get to stuff the beanbag! I often keep the packing peanuts from my doll orders, and maybe you do, too! For our larger beanbag sizes, you can use these packing peanuts and/or plastic grocery bags. I like to use a combo of both. For the Barbie size beanbag, it’s small enough that I used beans or rice in them. I think filling our American Girl sized bags with beans or rice would be expensive and heavy!!!

You can use your hands to fill it or, if your hand is too big to fit in the opening we made, I like to make a funnel out of a piece of paper! 

As you fill it, remember you do not want it filled all the way. Periodically check how it feels by pushing your hand into it, or go get your doll and try out having her sit in it! Keep going until you feel like your doll has enough support but can still make a nice little nest in the beanbag.


Step 12:  Time to sew up the opening! If you take your filled beanbag and hold it at either end of the opening and tug just a little, the seam should fold in nicely on itself and give you a nice line to follow to do your hand stitching. I prefer to do a ladder stitch, but you can also do a whipstitch. I recommend looking up videos on how to do these via YouTube if you do not know already, as my still photos do not help much! 


Once that is done, you now have your finished beanbag chair for your doll!


You can experiment with different sizes and heights and fillings and see what you like best. After following this tutorial, you'll know how to make a bean bag chair for dolls of all sizes!

We'd love to see your creations too, so if you make one, please tag us on Instagram @forofsuch @PixieFaire 

You can also share pictures in the larougetdelisle Inspiration Gallery right here on the website, either use the #pixiefaire when posting on IG, or just click the little + box to upload your picture right here on the website!


Thanks everyone!

For larougetdelisle, @forofsuch


ENTER TO WIN A $50 larougetdelisle Gift Card!


To enter this week's contest, simply click the link below and then enter through the giveaway widget at the bottom of the blog post, there are many things you can do to earn multiple entry points!

Contest Details: You enter through the entry form that is embedded on this page and appears just below this paragraph, if you don't see it, be sure to visit the page from your desktop or an alternate browser such as Google Chrome. It may not appear on all mobile devices. The complete rules and entry details appear on the entry form. This is not a comment contest - in other words, leaving a comment on the bottom of this page is not an official entry method. The only required entry method is to leave a comment under this post and then confirm that you did it in the contest widget. One person will receive the PF Gift Card. You can enter once, or gain multiple entries by completing the other entry methods and increase your chances of winning. Please review all Terms and Conditions on the giveaway page before entering. While we wish we could run this contest everywhere, for legal reasons it is only open to eligible residents of the U.S. and Canada, not including Rhode Island. This contest is exclusively endorsed by Liberty Jane Clothing and larougetdelisle. 

a Rafflecopter giveaway


We'd love to hear from you. Leave a comment and tell us - Which doll will you make a beanbag chair for? What fabric color or print will you choose?

Commenting below and confirming your entry in the widget above gives you one entry method, the other methods are listed in the widget above, be sure to enter in as many ways as you can to receive the maximum amount of entries to win the gift card!

 (This post and giveaway are not endorsed or affiliated with American Girl®, no endorsement implied.) 

]]>
https://larougetdelisle.com/blogs/doll-tips-and-tutorials/love-from-lola-button-flower-hair-clip-tutorial 2018-10-24T18:07:00-07:00 2018-10-24T18:08:23-07:00 Love From Lola Button Flower Hair Clip Tutorial Cammie Thomas

Follow along as Laura from Love From Lola shows us how to turn two buttons in adorable hair clip!

More

]]>

Follow along as Laura from Love From Lola shows us how to turn two buttons into an adorable hair clip!

This hair clip looks lovely with Laura's new Spanish Dancer dress, but will also compliment a variety of other outfits! 

Let's get started...

You will need:
- A scrap of paper
- Ruler
- Pen
- Scissors
- Scrap of fabric at least 5 x 5 inches
- Two different sized buttons
- Needle and thread


To start you will need to cut a circle out of your paper to make a pattern piece. Start by folding  your paper into quarters. Fold the bottom edge to the top, then fold the left side over to the right.

Using a ruler mark 2 inches from the folded point. Pivot the ruler from this center point marking 2 inches every so often. Connect the marks making a quarter of a circle.

Cut along the line. Unfold. You should now have a circle. Using this as your pattern piece, cut a circle out of fabric.

Using a needle and thread baste around the edge of the circle.

Pull the threads to gather the edge to the center. Pull the threads snug, forming a
tight gathered center. Tie the two threads together to secure in place.

Using two varying sizes of buttons sew them to the center of the flower.
I used a 1 inch button and a ½ inch button.

Slide a bobby pin through the stitches on the back.
Try on your favorite doll!

Experiment with different sized circles and different fabrics for a variety of looks.
Pictured below is a flower made with the original circle and a smaller 1 ½ inch circle.
Cut out the desired fabrics and gather the edges of both circles to the center. Stack the smaller circle on top of the larger circle. Sew buttons to the center stitching through both circles. Add your bobby pin and try on your favorite doll!


Happy crafting!

Laura and the larougetdelisle Team

]]>
https://larougetdelisle.com/blogs/doll-tips-and-tutorials/sweet-pea-fashions-fabric-flower-tutorial 2018-05-17T15:54:00-07:00 2018-05-17T15:54:58-07:00 Sweet Pea Fashions Fabric Flower Tutorial Cammie Thomas

Follow along as Jane from Sweet Pea Fashions shows us how to make beautiful fabric flowers that you can use to embellish your doll clothes! 

More

]]>


Follow along as Jane from Sweet Pea Fashions shows us how to make beautiful fabric flowers that you can use to embellish your doll clothes! 


What do you do when you have a bunch of hats to decorate, no artificial flowers, and a room full of fabric?  You make fabric flowers for your hats!  This technique makes quick work of crafting flowers that you can use to embellish any project.  They take very little fabric, and they can be made any size you need.  Let’s get started!

WARNING:  This project is not intended for children!  It involves working over  an open flame and materials that get very hot. 

Here’s what you will need:

  • Synthetic fabric - Just about any man-made fabric will work. Organza, satin, crepe, lace, are good choices.  However, be careful that your fabric isn’t too floppy.  Natural fibers such as silk, cotton, or wool will not work.
  • Candle – Any kind of candle will work. Make sure that the wick is trimmed to about ¼ inch before you light it.  Trimming the wick will give you a flame that is steady and doesn’t dance around.  Also, choose a candle that is relatively short. Since you will be holding your flowers above the flame, it will be easier to do with a shorter candle.
  • Needle and thread
  • Tweezers
  • Optional embellishments

Cut circles from your fabric that are slightly smaller than the finished size flower you need.  You need six to ten circles, depending on how full you’d like your flower to be.  These circles do not need to be perfect.  In fact, a little wonkiness just makes them more charming.  An easy way to make these is to stack a bunch of fabric squares and cut the circles all at once.

Make cuts in the circles from the edge to about a half inch from the center, like spokes in a wheel.  Again, you can stack the circles and make all the cuts at once.  This also does not need to be perfect.

Using your tweezers, hold each petal about an inch and a half above the candle flame until it begins to curl.  It will usually curl toward the flame.  This usually happens very quickly, so be vigilant.  Don’t touch the petal that you just singed.  The melted fabric is very hot.

This is what your singed petal will look like.  Repeat this process for each petal.

Don’t leave it in the flame too long!  It can burn the fabric, at best ruining your petal, at worst, flaring up so that you are holding a flaming petal with your tweezers.

It is worth the effort to practice on a few circles to get a sense of the amount of time needed to curl your fabric.

Repeat for the rest of the petals and for all the circles.

To assemble the flower, stack two of the circles together, and stitch them together through the center.

Continue stacking the circles and stitching them together. 

Stop adding circles when you get the fullness you want. 

If you want the flower to be less flat and more bowl shaped, fold the flower in half and make a couple of stitches across the fold.

Open the fold, fold it in half at a 90-degree angle to the first fold, and make a couple of stitches across that fold.

If you’d like your flower to have a center, glue or stitch an embellishment into the center.  Buttons, gems, or trims can be used.  You could even make a tiny flower to place in the center.

This flower has a button center.

For this flower, a beaded trim was coiled in the center of the flower and tacked down with thread.

Your flower is ready to be sewn or glued to your project! Check out how cute the Sweet Pea Fashions Springtime Straw Hat turned out with these fabric flowers!

Enter this week's Mod Doll Monday contest for your chance to win an 18" American Girl® doll and this cute outfit! 

Happy crafting!

Jane and the larougetdelisle Team


]]>
https://larougetdelisle.com/blogs/doll-tips-and-tutorials/shadow-work-embroidery-by-hand-free-tutoial 2018-03-22T14:53:00-07:00 2018-04-24T19:14:21-07:00 Shadow Work Embroidery By Hand Free Tutorial Cammie Thomas

Follow along as Craig from Sharp Dressed Dolls shows us how to perform the diamond and bow hand shadow work embroidery featured on his Marlene Dress. This is a great way to add an heirloom embellishment to any of your doll or child's clothes.

More

]]>

Follow along as Craig from Sharp Dressed Dolls shows us how to perform the diamond and bow hand shadow work embroidery featured on his Marlene Dress. This is a great way to add an heirloom embellishment to any of your doll or child's clothes. 


Let's get started...

Step 1. Starch the right side of the fabric and allow to dry and press. Repeat this step four to five times.
The starch will act as a barrier between the fabric and the drawn design, making the lead pencil marking easy to wash away. Shadow work is best worked on light weight, sheer fabrics such as Swiss batiste or handkerchief linen.

Step 2. Trace the shadow work design on the starched right side of the fabric with a fine point lead pencil.

Step 3. Cut a piece of embroidery floss approximately 18 - 25 inches long. Separate the strands of floss. Thread one strand of floss through your favorite shadow work needle. I suggest using a 10 sharp or a 26 tapestry needle.

Step 4. On a flat surface lay the threaded needle over the inner hoop ring. Leave three inches of the tail thread outside of the hoop ring, figure 1.

Step 5. Place the traced fabric over the thread and inner hoop ring with the design area inside the hoop, figure 2.

Step 6. Place the outer hoop ring over the fabric and thread. Tighten the hoop to secure the fabric and thread, figure 3.


Step 7. Bring the needle to the right side of the fabric at the beginning point (A), figure 4.


Step 8. To make the first stitch, take the needle down at point (B) to the wrong side of the fabric, figure 4.


Step 9. Move to the opposite side of the design and bring the needle up at (C) and back down at (B), figure 5. Pull gently.

Step 10. Bring the needle up from the backside at (D) and back down at (A), figure 6.

Step 11. Move down to the other side and come up through (E) and go back down at (C), figure 7.

Step 12. Move to the other side and come up at (F) and back down at (D), figure 8.


Step 13. Move to the other side and come up through (E) and down at (C) figure 9.

Step 14. When you come to large curve, make your stitches on outside (on the largest part of the curve) longer. Make the stitches on inside of the curve shorter. You may find it necessary to go in one hole twice on the inside area. Finish the design according to, figures 9 - 20.


Step 15. After you have finished with a design or with the amount of floss you have in your needle, weave that end into the back of the design. Re-thread the needle with the remaining end, and weave this end into the work as well, figure 21.

Hand Embroidery Shadow Work

Front


Back


Happy embroidering!

Craig and the larougetdelisle Team 

]]>
https://larougetdelisle.com/blogs/doll-tips-and-tutorials/34348421-make-fabric-flowers 2015-06-17T17:05:00-07:00 2018-01-21T15:27:43-08:00 Make Fabric Flowers! Cinnamon Miles

This week, follow along as we make super cute flowers from strips of fabric!

More

]]>

This week's tutorial is super fast and totally fun. And, the best part is, it helps turn those tiny, useless scraps of fabric into something cute....


All you need is a strip of fabric cut about 5/16" wide, and 6" long. Knit fabric works great.

(Oh, and in case you are still scratching your head about that 5/16", it's halfway in between 1/4" and 3/8" -- it sounds way more complicated than it is :)

Knot your thread, and start working a running stitch along the bottom edge of the strip. Your stitches don't have to be terribly even, just keep them as near the bottom edge as you can. 

When you get to the end, pull up the gathers so that the strip is about half its original length (3"). Tie a knot to secure your thread.

Now it's time to start actually forming the flower!

Fold over the corner of one end, to make a little triangle shape. This will be the center of the flower. Stitch the corner down, along the line of gathering stitches.

Then just start rolling the strip up on itself, stopping and stitching through the bottom periodically to hold everything in place. Here's a top view...

....and a side view.

Keep rolling and stitching till you get to the end. Then, tie off your thread, and there you are -- one completed flower!

Don't worry if your first couple flowers look a little weird. That's ok -- sometimes it takes a while to figure out how to place the gathers for the most attractive flower.

If you want a fuller flower, pull the gathers up tighter; for a skinnier flower, use less gathers. The 2:1 ratio (6" gathered down to 3") gives a nice medium-sized result. 

I love making these out of knit fabric strips, but you could also try a woven fabric, cut on the bias, for a different look. Here is a picture of a bias strip. :)

These three flowers were all made with different widths of strips! See what a difference even 1/16" makes?

(Left to right: 1/4", 5/16", and a shy 1/2".)


These flowers look great on headbands, purses, shoes, belts, tees, and -- of course -- tanks!

Have fun using them on your own creations!

Thanks everybody, and have fun with this!

For larougetdelisle,
Melinda

***GIVEAWAY UPDATE: We have a winner! By random number, our winner is Emma! She said, "my favorite is roses and carnations so cliche lol"


]]>
https://larougetdelisle.com/blogs/doll-tips-and-tutorials/26547588-faux-necklace-tank 2015-05-20T17:53:00-07:00 2018-01-21T15:39:54-08:00 Faux Necklace Tank Melinda Schlimmer

Spruce up a basic tank with this faux "necklace" -- by combining embroidery, chain and embellishments! It's super fun, and this particular version has a really great Parisian vibe... 

More

]]>

Wanna add some awesome decorations to a plain tank? Layering embellishments is a great way to add a faux "necklace" -- and this one has a very classy, almost Parisian vibe. Here's how!

*Note - The tank top featured is made from the Low Scoop Variation available in either the T-Shirt Variations Pattern or the Killara Pattern. You can also use the Free T-shirt or Free Tank Top patterns

You'll need embroidery floss, chain, a few beads, some ribbon -- and a tank. :)

**UPDATE: Giveaway closed, we have a winner! It's JJ, who said, "If I went to Paris, the thing I’d have to see would be the Tour Eiffel! And then get a baguette =) " Good call, JJ! We'll be in touch with you via email soon.

Thanks everybody for entering! It was awesome to read all of your travel ideas!

OK, now back to the tutorial....

First off, figure out where on the tank you'd like the "necklace" to land. Mark this with a fabric marking pen, chalk, or a plain ordinary pencil. (I marked mine with thread, so you could see it better.)

Then, sew a chain stitch along the line: take a short stitch with your needle, and then wrap the thread around it. Pull through gently, creating a loop. Put your needle back down in the same hole to begin the next stitch.

When you get to the end, sew a short stitch to secure the last loop (second picture). 

If you need help sewing the chain stitch, you can check out our video version of this tutorial, and see exactly how I did it: 

Time to add some real chain!

Sew one end of a piece of chain to the shoulder. Drape it gently across the front of the tank, then stitch a link down at the middle of your embroidery. Use jewelry pliers to open or cut a link, so that you have a good length at the end.

Repeat for the other side. 

Then, tie a cute little bow out of ribbon. I used 1/4" wide ribbon here, which is really easy to get a hold of, and works great for this scale.

Sew (or, if you're tired of sewing, glue!) the bow down, right over where all the chains meet in the middle. 

Finally, sew down a few pearl beads. I scattered mine along the embroidered "strand" of the necklace. 

Congratulations!

Thanks everybody, and have fun with this!

For larougetdelisle,
Melinda

]]>
https://larougetdelisle.com/blogs/doll-tips-and-tutorials/17860948-how-to-add-a-basic-pocket 2015-03-25T15:51:00-07:00 2018-01-21T15:39:54-08:00 How to Add a Basic Pocket Melinda Schlimmer

It's easy to add this super basic pocket to an existing skirt! Follow along, and I'll show you how to add this pop of color (and practicality) to your doll's wardrobe.

More

]]>

Hi everybody! Today, I show you how to add a super simple pocket to an existing skirt. This is really fast to do, and adds a fun pop of color (and practicality)!

GIVEAWAY UPDATE: we have a winner! She says, "My favorite pocket EVER was a welt pocket I put in a plaid outfit while I was in college. It was in a cape which matched a skirt and vest & all the plaid matched so the pocket was invisible but wonderfully practical." Marian, that is a great story, and I'm sure that pocket was spectacular! We'll be in touch via email soon. :)

All you need is some fabric, and a skirt. (You can also grab some cute trim, like I did -- but the trim is optional.)

Figure out the size and shape of your pocket. I like to do this by cutting up scrap paper, until I get something I'm happy with. This pocket is a rectangle 1.5" high x 1.75" wide. (If you're not sure about where to start, you can always use your doll's hand as a guide. :) 

Trace around your pocket template onto another piece of scrap paper, and add 1/4" extra to the sides ("seam allowance") that you can fold over later. I added it to both sides and the bottom, but not the top, since I wanted the raw edge look along the top of my pocket.

Cut out the pocket!

If you're using trim, now is the time to sew it down along the top of the pocket.

If you aren't using trim, and you left some extra fabric along the top of the pocket, fold it over now and sew that down.

Press under the other three edges of the pocket.

Carefully place the pocket on the skirt, and pin it down. You can put a hard plastic ruler, or a piece of cardboard, inside the skirt; this will help make sure you just pin through the top layer. 

Sew around the folded edges of the pocket. Don't forget to backstitch at either end of the top of the pocket! 

And that's it -- congratulations :)

Thanks everyone, and have fun with this!

For larougetdelisle,
Melinda

]]>
https://larougetdelisle.com/blogs/doll-tips-and-tutorials/17727648-bow-sleeve-tee 2015-03-11T21:59:00-07:00 2018-01-21T15:34:56-08:00 Bow Sleeve Tee Cinnamon Miles

Add these cute bows to a basic tee shirt with this fun, free tutorial! Click through to find out how... it's super fast and easy!

More

]]>

This is a super fast, easy technique to add to your favorite basic tee!

Today, I'm using the free Liberty Jane Trendy Tee. It's super easy to sew up, and we have it available for many different doll sizes... :)

Giveaway update: Thanks everybody for entering, we have a winner! It's Leonore, who said, "My mother taught me to tie my shoes. It wasn’t easy for either of us, because she was right-handed and I am left-handed." I am glad you figured it out -- the righty/lefty distinction can be tricky sometimes! We'll be in touch via email soon, Leonore :)

Cut out all your pieces -- and cut a couple pieces of matching ribbon. Mine are about 10" long, but you don't have to be very precise (you'll be trimming these down later). 

Follow the directions in the guidebook to sew the shoulder seams, and hem the neck edge.

Then, find the middle of your pieces of ribbon. Pin one to the outside edge of each shoulder. 

Hem the sleeves by zig-zagging over the hem edge, and turning it up once. Topstitch this single folded edge down.

Pin and sew the sleeves into the tee -- being sure you're sandwiching the ribbon between the sleeve and the body of the tee.

Trim and finish this seam, but be sure not to clip off any of the ribbon on the inside!

Finish your tee shirt, following the guidebook instructions (sew the side seams, hem the bottom, and add a closure at Center Back). 

Then, tie the ribbons up into bows, and trim the ends off neatly. If your ribbon doesn't like staying tied, you can stitch through the bows once or twice to keep them in place.

And that's it! Congratulations!

Thanks everybody, and have fun with this :)

For larougetdelisle,
Melinda

]]>
https://larougetdelisle.com/blogs/doll-tips-and-tutorials/17156548-heart-on-my-sleeve-sweater 2015-02-11T12:09:00-08:00 2018-01-21T15:39:54-08:00 Heart on my Sleeve Sweater Melinda Schlimmer

Just in time for Valentine's day -- make this cute little sweater using just five rectangles of fabric! (And, a couple of heart shapes too...) Click through to find out how.

More

]]>

Just in time for Valentine's Day! Show your doll some love by making her this fun little sweater. It goes together super fast, and all it takes is just five rectangles....

GIVEAWAY UPDATE: We have a winner! It's Lynda, who said her favorite Valentine's Day tradition is "to spend it with the one you love". Hard to go wrong with that Lynda! We'll be in touch via email soon. And thanks to everybody who entered!

You can use a stretch lace or a light knit -- but in any case, your fabric needs to stretch a little to be sure it'll fit right :)

Cut five rectangles:

One for the back, 4 3/4" x 8"

Two for the front, 4 3/4" x 3 1/4"

Two for the sleeves, 4 1/2" square

And, optionally, some little hearts out of coordinating fabric. :)

To hem the Center Front edges, press under one long edge of each front piece, twice, to form a double-turn hem. Topstitch in place.

Pin the fronts to the backs along the top edge. Make sure you have right sides together, and that the hemmed edges are facing each other.  Stitch, and then zig-zag along the entire edge (including the un-stitched section of the back).


Press both seams to the back, and then also press under 1/4" along the un-stitched back edge. This will become the back neckline. Topstitch everything down nicely.

Next, hem one edge of each sleeve. If you're using a stripe like me, go ahead and hem one of the edges where the stripes meet it vertically -- that way the stripes will be oriented in a nice direction on the finished sweater. 

You can also stitch your little heart applique down at this point too :)

Mark the middle of each sleeve with a pin. 

Then, pin and sew the sleeves to the sweater body, matching the pin to the shoulder seam. Don't forget right sides together :) Zig zag over this seam when you're done. 

Fold the sweater in half at the shoulders, and pin and stitch the underarm/side seams. 

Finally, hem the lower edge. Give the sweater a good press, and then style it into your doll's wardrobe!

Thanks everybody, and have fun with this!

For larougetdelisle,

Melinda

]]>
https://larougetdelisle.com/blogs/doll-tips-and-tutorials/16911088-undersea-embroidered-pants 2015-01-28T18:16:00-08:00 2018-01-21T15:39:54-08:00 Undersea Embroidered Pants Melinda Schlimmer

Make this 'splashy' pair of under-sea inspired pants using an easy embroidery stitch!

More

]]>

Today, I show you how to use the feather stitch to make this fun pair of deep-sea inspired pants.

**UPDATE: Giveaway closed! Thanks everyone for entering, our winner is Lea Ann who said, "My favorite creature in the sea is the SEAHORSE!!" Great choice Lea Ann :) We'll get in touch with you via email soon!

All you need is a pair of plain old pants, some embroidery floss in coordinating colors, and a needle!

Cut a piece of floss 18-25" long -- shorter is better since it tangles less, but it's frustrating to have to keep rethreading... 

Pull the floss apart into individual strands, one at a time; then, put three strands back together again and thread your needle. This step is a little tedious, but it really cuts down on the number of tangles! Knot your threads together at one end.

Ready to do the feather stitch?

1. Bring your needle up to the right side of the fabric. 

2. Put your needle back down into the fabric, about 1/4" away from where it just exited. Then, bring the point up directly below the initial stitch point. Wrap your floss around the point of the needle. It can help to think that you're drawing an equilateral triangle with each stitch.

3. Gently pull the floss through.

4. For your second stitch, you have two options: stitch again on the same side, or stitch on the opposite side. You can see both options in the picture above. This will change which way the seaweed "branches". I enjoy alternating directions, but throwing in a stitch or two in the same direction every now and then gives a slightly different effect.

5. When you reach the end, bring your thread to the backside, making a tiny stitch to hold the final loop in place. Tie off your floss on the back.

Embroider more rows of feather stitching! You can vary the number of strands used at a time (I stitched with three, two and one strands) as well as the color -- this gives a very interesting, multi-textured look, without taking a terribly long time.

Then, just for kicks, I added a few rows of featherstitching to the back pocket -- and used satin stitch to sew on a tiny fish! (He's entirely optional though :) 

Now your doll has some splashy new pants to wear whenever she feels the urge to pretend she's deep sea diving...

Thanks everybody, and have fun with this!

For larougetdelisle,
Melinda


]]>
https://larougetdelisle.com/blogs/doll-tips-and-tutorials/16044744-color-splash-miniskirt 2014-11-26T17:01:00-08:00 2018-01-21T15:39:54-08:00 Color Splash Miniskirt Melinda Schlimmer

Add a fun splash of color to an existing skirt with this easy tutorial!

More

]]>

Add a splash of color (and pattern) to an ordinary skirt using this fun technique!

It's easy -- all you need is a miniskirt, some scrap fabric and ribbon, and a sewing machine.

**UPDATE:

Thanks to everyone who entered our giveaway, we have a winner! Sue said, " Very cute. I definitely would add a splash of pink as all 5 granddaughters love it, but lime green would be great, too." Totally rockin' color combo, Sue! We'll be in touch with you via email soon :) 

Start by sewing the ribbon onto the piece of scrap fabric. I decided to make stripes, but you could make a checkerboard pattern, or even do a loopy design...!

When you're done, tidy up the edges of the fabric by clipping off the extra bits of thread and ribbon. 

Then, take your miniskirt and mark off where you want to add the color splash. Make sure your desired splash isn't bigger than the scrap you just embellished. :)

Set your machine to a short (2.0) stitch length, and stitch around the line you drew. This is called "staystitching". 

Cut out the middle of the splash area, being sure to stay about 1/8" away from your staystitching. 

Slip the splash into the miniskirt, and play around with it until you like the arrangement. Pin it down, and sew it into place on top of your staystitching line.

Clip off any extra splash material from the back, and if you want, go ahead and zig zag around the edges to finish them. From the front side, rough up the raw edges of the skirt with your fingernail, to give it a slightly distressed, "lived-in" look.

Then, all that's left is to have fun styling your splashy new skirt into your doll's wardrobe :)

Giveaway closed -- thanks everybody for entering! 

Thanks, and have fun with this!
For larougetdelisle,

Melinda

]]>
https://larougetdelisle.com/blogs/doll-tips-and-tutorials/15852528-leaf-applique-jeans 2014-11-12T22:18:00-08:00 2018-01-21T15:39:54-08:00 Leaf Applique Jeans Melinda Schlimmer

Add a dash of fall pizzazz to ordinary pants with this super quick applique technique!

More

]]>

Got a pair of pants that needs some spiffing? This quick technique adds a pop of pizzazz to ordinary pants!

**GIVEAWAY UPDATE:  Thanks to everybody who entered, we have a winner!  Hannah said, "I like trying to catch the leaves! The pants are so cute. I would make my doll wear them all the time." Well, she'll definitely have the chance to! We'll be in touch and get those pants to you and your doll soon :)

Find some leaf-colored fabric scraps, get out your double sided fusible (like "Wonder-Under" or "Stitch-Witchery"), and prepare to applique!

Cut squares from the fabric and the double-sided fusible. Then, use your iron and follow the directions to fuse the exposed side of the webbing to the fabric. 

Draw leaf shapes on the paper side, then cut them out. You can freehand these, use a stencil, print off leaf shapes from the internet, or (gasp!) trace around tiny, real leaves :)

Roll up a towel and stuff it down the pant leg you want to embellish. Then, peel the paper backing off your leaves, revealing the other side of the fusible, and position them on the pants.

Using a press cloth to protect your fabric, fuse the leaves into place. Let them cool thoroughly before pulling out the towel.

You can go back in at this point and add decorative hand stitching, if you'd like -- but the fusible should hold the leaves in place.

Giveaway closed -- thanks everyone for entering!


Thanks everyone, and have fun with this!

For larougetdelisle,
Melinda

]]>
https://larougetdelisle.com/blogs/doll-tips-and-tutorials/15711476-quick-candy-corn-dress 2014-10-29T22:10:00-07:00 2018-01-21T15:39:54-08:00 Quick Candy Corn Dress Melinda Schlimmer

Get your doll into the Halloween spirit with this fun, candy-corn inspired dress!

More

]]>

This week: Make your doll a fun, Halloween-themed dress that looks like candy corn! And the best part: all you need is the FREE Liberty Jane Trendy Tee pattern, a pencil, and some colored fabric!

So...download that pattern, dig through your fabric stash, and let's make this!

**UPDATE: Giveaway Closed, thanks to everybody who entered! Our winner is Sher, who said, "My favorite Halloween candy is Almond Joy – (always got these because my kids don’t like them) YUM!" Great pick Sher! We'll be in touch via email soon :) **

This first part is probably the most complicated -- but if you have some paper and a pencil, you can do it :) Basically, I lengthened the tee shirt pattern, so it was a dress, and then cut it up into sections to make it look like a piece of candy corn. 

Trace around the T-shirt pattern, then draw another line 2 1/2" below the hemline. 

Mark in a point 1/2" below the armhole, and another point 1 1/2" down from the neckline. Connect these two points with a smooth curve --- this is going to be the top section of your "candy corn"! 

Measure down 4" from the neckline, and draw a line straight across  to make the middle section. Erase the original hemline so you have one long section for the bottom. 

Then, trace around the back piece onto another piece of paper. Extend the bottom 2 1/2", just like you did for the front. Use the lines you drew on the front, as guides to draw matching sections onto the back.

Cut all the sections out, and tape extra paper along the lines you drew for seam allowance. I used 1/4", so that it would be consistent with the rest of the pattern.

Fabric time! Cut out two of each back section, and one of each front section (making sure that the long vertical line of each front piece is on a fold). Then, cut out an extra set of top pieces.

Set aside the extra top pieces, and sew all the panels together to make one front, and two back pieces. Then, sew the dress together at the shoulder seams.

Now, take the extra pieces you cut out earlier, and sew them together at the shoulders. They will become the lining.

Lay the lining piece over the main dress, making sure you have the right sides together (both shoulder seam allowances should be facing out). Pin along the neckline and armscye (armhole) edges, then sew. Clip into the seam allowance, and turn the dress right side out through the shoulders. Press it gently to get a nice edge along the neckline and armscye.

Sew the side seams, and center back seam. Add velcro, and then sew a hem! (If you need help with these final steps, they should be the same as in the pattern for the T shirt...)

Now your doll is ready for all kinds of Halloween fun!

Giveaway closed!

Thanks to all our entrants! 

Thanks everyone, and have fun with this! 

For larougetdelisle,
Melinda

]]>
https://larougetdelisle.com/blogs/doll-tips-and-tutorials/15659648-quick-last-minute-capes 2014-10-15T15:05:00-07:00 2018-01-21T15:39:54-08:00 Quick Last Minute Capes Melinda Schlimmer

Make your doll her very own cape using this fast, free technique -- it'll be a fabulous finishing touch to her Halloween costume!

More

]]>

Looking for a fast project to help finish off your doll's Halloween costume? Look no further!

**UPDATE: Thanks to everyone who entered the giveaway, we have a winner! Lena Juka said, "Definitely a princess. Females super heroes would be more compassionate and caring than male super heroes. GIRL POWER!" 

All you need is some fabric scraps, cute ribbon or trim, some blank paper and a ruler. I used this technique to make a fun, short superhero-y cape, and a longer princess cape. 

First, grab your paper and we'll make a basic pattern. (Don't worry, it's actually a lot easier than it sounds....!)

1. Draw a long vertical line down the middle of your paper. At the top of this, draw a 3" line.

2. Then, mark a point 3/8" down from the top of the "T".

3. Draw a curved line from the mark up to the corners of the top line. This is the neck of your cape!

4. Then, measure down the length of your cape. (Short cape: 8 1/2", long cape 17". You might need to tape on a second sheet of paper...) Draw in a line for the bottom of your cape. Make it as wide as your finished cape (short: 8"; long 10-12"). 

5. Connect the line at the bottom, to the points up at each corner of the neckline. From the neck, measure down the length of the cape, and mark. 


Then, draw in your curved hemline. Ta Da!

If you are making a felt cape, you're all set: cut the pattern out of felt.

Then, use felt scraps to make a fun logo for the back of the cape. Sew that down....

...and sew on a piece of twill tape, ribbon, or other fun trim around the neckline. About 20" works well.

If you want to make a cape out of something that will fray, like lace or fabric, add an extra 1/4" around all the edges of your pattern before cutting it out.


Then, serge or zig zag over the raw edges. Turn them to the backside of the fabric, and topstitch them down.

Sew on a tie, and there you are -- another awesome new cape!

Giveaway Time!


***Giveaway closed, thanks to everybody who entered!***
To enter, just leave a comment below, answering this question:

If you could be either a princess or a superhero, which would you be? Why? 

(Princesses are fabulous, but I'd probably be a superhero because then I could fly...)

We'll run the giveaway through next Monday, the 20th, and get in touch with the winner by email. You should have the capes in plenty of time for Halloween!!

Thanks for following along everyone, and have fun with this!

For larougetdelisle,
Melinda


]]>
https://larougetdelisle.com/blogs/doll-tips-and-tutorials/15425885-bleach-resist-tee-shirt 2014-09-17T15:26:00-07:00 2018-01-21T15:39:54-08:00 Bleach-resist tee shirt Melinda Schlimmer

Use bleach to transform a basic tee shirt for a fresh, edgy new look! 

More

]]>

This week, I show you how to add a splash of color to a dark tee shirt -- using bleach! 

UPDATE: giveaway closed!

Thanks to all who entered, the lucky winner is Cindy! She said "My favorite bleach has always been Clorox but I love the new splash resistant formula. Gotta win this darling tee!" We'll be in touch with you soon, and congratulations!

-----------------------

You can use a pre-made tee for this project, or you can make your own tee using the free Liberty Jane Trendy Tee Shirt pattern. (Making your own tee allows you to run tests on the fabric before bleaching your final tee....this can be a good idea if you are timid about just jumping in.) 

You'll need a dark colored doll tee shirt, some masking tape, diluted bleach in a spray bottle, and vinegar. (Don't forget some safety gear -- bleach is a pretty nasty critter!)

The most dilute bleach solution that will work, is one part bleach to eight parts water. Of course, if you want more extreme color change, you can use a stronger solution than that -- but don't go beyond one part bleach to two parts water. I'm using about a 1:4 ratio of bleach to water, in this tutorial. 

Using an exacto knife and the masking tape, cut out some shapes ("resists"). You could also do this with scissors. 

Carefully, peel up the resists, and stick them down firmly to your shirt. Protect the back of the tee with a piece of scrap cardboard, and you're ready to bleach!

Protect your work space with an old rag towel, and then apply the diluted bleach in a couple of quick sprays. It takes a few minutes to see any activity, so don't fret if you don't see anything at first. (It can actually take up to 10-15 minutes for maximum color change.)

While you're waiting, mix up equal parts of water and vinegar in a bucket. The vinegar will neutralize the bleach, and thus put a stop to its fiber-eating activities. 

When you're happy with how much the color has lightened, drop your shirt into the vinegar and water mixture. Swish the shirt around, and let it sit for another 15 minutes or so.

Peel off the bits of masking tape, and throw the tee in the wash. Let it dry, and you're done!

I love the way this technique uses ordinary household supplies, to get such a 'tough urban girl' feel. 

*Giveaway Closed*

Now -- would you like to win this fun little tee? 

To enter, you only need to leave a comment below, finishing this sentence: 

"My favorite kind of bleach is....." 

We'll pick a winner on Monday, 22 September, and get in touch via email. 

Thanks for following along, everyone -- have fun with this!

For larougetdelisle,
Melinda

]]>
https://larougetdelisle.com/blogs/doll-tips-and-tutorials/15288305-double-dipped-ombre-dress 2014-09-03T19:59:00-07:00 2018-01-21T15:39:54-08:00 Double-Dipped Ombré Dress Melinda Schlimmer

Use a free larougetdelisle pattern and some simple ombré dyeing techniques to make this super cute dress!

More

]]>

Thanks to all who entered our giveaway! Scroll down to find out who won....

This week, I show you how to dye this fun, two-toned ombré dress! Your doll will love this trendy addition to her back-to-school wardrobe....

My dress is made from the free Drawstring Dress pattern, from Heritage Doll Fashions -- but you could use this technique on almost any garment. Just make sure you are using a dyeable fiber -- 100% cotton fabric is a great way to start. 

Gather up your dress, a few rag towels and old containers, and your dye. I usually use liquid dye; it's actually easier to use than the powdered kind! It's a lot less messy and stressful, and it's easier to mix colors.

Let the entire dress soak in plain water for about 20 minutes or so. This will help the dye molecules move around evenly within the dress.

While your dress is soaking, you can prep your work surface (either in a craft sink, or cover your craft table with rag towels) and make your dyebath. Follow the directions on the package, and test a scrap of fabric first to make sure you like the color. :) 

Ready for round 1? 

Start dipping your wet dress into the dyebath. The lightest portions of the dress should be in the dyebath for a grand total of perhaps 30 seconds or a minute, while the bottom could easily soak for 20-30 minutes, depending on how dark you wanted it. Try to time out the middle sections accordingly. 

You don't have to spend the entire time holding the dress (you can lay the top over the side of the bucket, for example, while the bottom is soaking) but it's best not to walk away. To avoid uneven "stripes" in your color, make sure to keep things moving! You are aiming for a smooth, continuous color transition.

When you've got the color the way you want it, rinse the dress out until all the water runs clear. Then, prep the second color of dye...

...and dip the other side! I overlapped my two colors just ever so slightly -- but feel free to play around to see what you like. 

When you're happy with the color, rinse the dress again, and give it a good bath with some detergent to carry off any extra remaining dye molecules. 

Rinse out all the suds, wring the dress out in a towel, and dry it -- you can hang it to dry, run it through the dryer, or iron it dry. I like the last option, as it simultaneously dries the dress faster AND helps heat-set the last bits of color -- and you don't wind up with any of those pesky perma-wrinkles :) 

Accessorize your dress, and you're all done!

Giveaway Closed!

Thanks to everybody who entered! You had so many fabulous ideas for color combos :) Our winner is Gale, who said, 

I would use hot pink and orange. Then after it dried I would dip the center in yellow. Perfect for Julie!

Gotta love those bright colors :) We'll be in email contact with you soon! 


Thanks for following along everyone, and have fun with technique!

For larougetdelisle,
Melinda

]]>
https://larougetdelisle.com/blogs/doll-tips-and-tutorials/15041265-easy-to-sew-needle-book 2014-08-06T08:00:03-07:00 2018-01-21T15:39:54-08:00 Easy to sew Needle Book Melinda Schlimmer

Capture and contain your needles with this quick-to-sew needle book! Make it up in doll size, and it's the perfect addition to your doll's design studio....

More

]]>

This week, let's make this fun, doll-sized needle book! It sews up really fast using some basic hand stitches, and even features a fun little pocket on the front for your doll's tiny scissors.... 

All you need is some felt in fun colors, a little embroidery floss, a needle, and of course, those tiny scissors :)

Cut out your felt (no shame in using big people scissors for this step). I cut a single page from cream felt, then cut a cover that was just over twice as wide as the page, and a little bit taller. If you want to add a scissors pocket on front, make sure the cover of your book is bigger than your scissors. :) 

You could also add more pages if you wanted, but for this tutorial I'm keeping it simple.

Fold the cover over your page(s), then backstitch along the spine. (Not sure how to backstitch? Check out this post for how-to-help!)

Cut some hearts out of felt, to make the front pocket. Using a running stitch, sew the smaller heart onto the main heart, for decoration. 

Position your pocket on the front of the needle book. Then, backstitch along the outside of the heart, being sure to leave the top edge unsewn!

Load up the book with your needles (I like to add a few pins, just for good measure)....

...and slip your scissors into the front pocket. Congratulations!

Have you ever made a needle book? Do you use it? Let us know in the comments below -- we'd love to hear from you!


Thanks for following along, everybody! Have fun with this, and we'll catch you next time!

For larougetdelisle,
Melinda

]]>
https://larougetdelisle.com/blogs/doll-tips-and-tutorials/14819225-wrist-pincushion 2014-07-10T12:47:00-07:00 2018-01-21T15:39:54-08:00 Wrist Pincushion Melinda Schlimmer

Follow along with this week's tutorial, and learn how to make this adorable little wrist pincushion for your doll!

More

]]>

Hello all! 

Thanks to everybody who entered our giveaway, we have a winner! #10, Chris, who said "My pincushion is a silver creamer with the cushion made from antique laces and trims. It was my Nana’s back in the 1940s." That sounds like a wonderful pincushion! We'll be in touch via email soon...


-----

For the next couple weeks, I thought it would be fun to do some sewing-themed crafts -- and we're kicking it off with this adorable little wrist pincushion. It works up fast and is a great way to use up tiny fabric scraps.

You'll need a piece of awesome fabric, some batting or stuffing, a little bit of elastic, a button, and some lightweight cardboard.

Cut out a square of fabric (mine was about 2 1/2" square) and then round off the corners.

Thread a needle and work some running stitches around the outside of your piece of fabric. When you've gone all the way around, pull up the stitches and stuff the cushion with some batting or stuffing. 

Pull the stitches tight to close the pincushion; tuck the raw edges of the fabric to the inside, and stitch across the bottom a couple times to hold it closed. 

Then, stitch up and down through the cushion a couple times, pulling the thread tight to make a little dent. Stitch on your button, and tie a knot in your thread at the back.

Cut a piece of elastic a little longer than your doll's wrist, and stitch both ends down to the back of the pincushion to make the wrist loop. Tie off your thread -- you're done sewing! Yay! To finish off, cut a little cardboard circle, just smaller than the bottom of the pincushion, and hot glue it to the underside. This has two purposes: it makes the bottom look pretty, and it keeps the pins from going all the way through the cushion. :) 

Load up the cushion with pins, and put it into service!

**UPDATE: Giveaway closed! Thanks to all who entered!**

NOW: would you like to win this little pincushion? To enter, just leave a comment below, telling us what your pincushion looks like! (Or, if you don't have one, tell us about the one your grandma had...or your mom....or your aunt...or your best friend...)  We'll run the giveaway through Monday, July 14, at which point we'll pick a winner randomly and contact them via email. 

Thanks for following along everybody! Have fun with this!

For larougetdelisle,

Melinda

]]>
https://larougetdelisle.com/blogs/doll-tips-and-tutorials/14285429-hand-dyed-school-glue-resist-tee 2014-05-28T16:45:00-07:00 2018-01-21T15:39:54-08:00 Hand-Dyed School Glue Resist Tee Cinnamon Miles

Give an old tee shirt a new lease on life with some school glue and dye! 

More

]]>

This week, I wanted to show you an easy and fun surface design technique -- dyeing with a resist!


First off, a definition: a 'resist' is anything that keeps dye off a given part of your fabric. Resists can take many forms -- the rubber bands in tie dye, for example, or even fabric crumpled against itself -- but today I'm using plain ordinary white school glue. It's easy to make fun patterns with it, and it washes out once you're done dyeing the fabric.

So, grab a tee shirt, some dye, and a bottle of white glue!

Protect the back of your shirt by slipping a piece of scrap cardboard between the front and back. Then, start 'drawing' with the glue. It works best with bold, thick-lined designs. Set the shirt in a safe place to dry overnight.

Once your glue is dry, make up the dyebath following the directions on the dye package. Drop the shirt in. Stir for even color -- or, if you're feeling brave, leave a few wrinkles in the shirt and see what happens...

Once you are happy with the color (and keep in mind, it always dries lighter than you think it should) dump out the dyebath and start rinsing.

Follow the directions on the dye package -- and don't rush through this step! All those extra dye molecules can come out either now, in the sink, or later (on dolls and hands and in the laundry...)

During the final stages of the rinse, add a little laundry detergent and give it a hand-wash. All the glue should have washed out by now.

Roll the shirt up in a towel to soak up the excess water, then throw it in the dryer on high for about 30 minutes. This is called "heat setting" and is another way to help ensure the dye molecules stay where you want them. :) 

All done! Congratulations!

For larougetdelisle,

Melinda

]]>
https://larougetdelisle.com/blogs/doll-tips-and-tutorials/13014309-easy-embellished-spring-tank-top 2014-03-21T05:30:00-07:00 2018-01-21T15:39:54-08:00 Easy Embellished Spring Tank Top Melinda Schlimmer

Use this basic embroidery stitch and a pre-made crochet flower to brighten up a tee or tank for spring!

More

]]>

Ready to spice up a plain tee or tank for spring? Let's do it!

I'm using embroidery floss, these fun little crochet flowers I found, and oh yes, a plain tank top :)

Start by figuring out what you'd like your design to look like. I'm putting the flower up on one shoulder, and will embroider a couple leaves down below it.

Then, cut off a length of embroidery floss, and thread your needle. Floss usually comes in a six-strand bunch, but I'm just using two strands at a time here.

"Outline stitch" makes for some very nice leaves. Here's how to do it: 

Knot your thread and bring it to the right side. Then, take a stitch backwards and bring the needle back up where it first emerged. Pull the thread through.

Make the next stitch the same way; back the needle up, and bring the point up where you just finished stitching. This should give you long loops of thread on the outside, and shorter stitches on the inside. (Trivia time: did you know that the wrong side of an outline stitch is actually a backstitch, and vice versa? Pretty cool! Check out this post to learn more about the backstitch.)

When you get to the end of your leaf/stitching line, run your needle to the backside of the work, and tie the thread off.

Finish up by sewing (or gluing!) down your crochet flower. And there you have it -- one tee, brightened up for spring!

Have fun, and let us know in the comments if you end up making this! 

Thanks for following along!

For larougetdelisle,

Melinda

]]>
https://larougetdelisle.com/blogs/doll-tips-and-tutorials/11803301-striped-throw-pillow-for-dolls 2014-01-24T09:00:00-08:00 2018-01-21T15:39:54-08:00 Striped Throw Pillow for Dolls Melinda Schlimmer

Play around with fabric paint, and turn some ordinary fabric into a super cute throw pillow for your doll!

More

]]>

Today's tutorial will show you how to turn plain, ordinary fabric into this super cute little pillow!

You'll need two pieces of fabric (mine are about 4 1/2" square), as well as some blue masking tape and some fabric paint.

Start by prepping your work surface: cover a hard surface with waxed paper, and make sure you're working in a place that can get a little dirty. :D 

Mask off the square in your desired pattern -- to keep it simple, I'm doing stripes that are the full width of the tape. Once you have the tape placed, squish it down along the edges to give yourself a good clean line. 

And....paint! A couple of thin coats work better than one or two thick coats; thin coats are also less likely to bleed underneath the masked lines.

Let the paint dry, then, if the manufacturer recommends it, heat-set the paint. You can usually do this by running it through the dryer for about 30 minutes, or use an iron and a press cloth. 

Now let's turn your painted panel into a pillow! Lay the back piece over the front piece, pin along all four edges, and stitch around the outside. You can do this by hand or by machine. Just be sure to leave about 2" unsewn in the middle of one side.

Trim off the extra fabric at the corners, then turn the pillow right side out through the opening you left.

And fill it with stuffing! You can use a chopstick to help get the stuffing into the corners.

Finally, hand-sew the opening closed.

And there you have it -- a fun little throw pillow! 

What kinds of patterns do you want to paint on your throw pillow?  :D 

For larougetdelisle,
Melinda

]]>
https://larougetdelisle.com/blogs/doll-tips-and-tutorials/10351545-doll-sized-potholders 2013-11-22T13:02:11-08:00 2018-01-21T15:41:38-08:00 Doll-Sized Potholders Melinda Schlimmer

Make your doll some potholders, just in time for her to help with all the Thanksgiving festivities! 

More

]]>

Let your doll join in the Thanksgiving festivities by making her her own appropriately sized potholder! This is a great scrap-busting project, and doesn't take very long at all. So, break out your scissors and fabric scraps, and let's get started!

You'll need two squares of fabric and one or two squares of batting for each potholder (mine were 2 1/4" big) plus a long strip of fabric, pressed in half, for the binding. 2" wide x 12" long worked great.

Start by stacking your potholder body -- put one piece of fabric wrong side up, then sandwich a piece of batting between it and the top piece. Pin everything together, then stitch across the sandwich to secure it. Try diagonals or squares for starters, or circles for a challenge.
Next, lay your binding along one edge of the quilted sandwich -- line up the raw edges, checking that the fold is pointing in towards the middle of the potholder. Stitch from the top edge down, making sure to stop 1/4" from the bottom edge (it's marked with a black line in the picture). 
Fold the binding over itself to turn the corner, then stitch from the top edge down to 1/4" from the bottom again. 
At this point, you should be able to pop open the binding and double check -- yes, you did just make a beautiful miter! Stitch the third side, turning the corner and stopping 1/4" from the bottom as before. 
Next, fold the first part of the binding around the edge of the potholder, and pin it into place. Sew the fourth edge from top to bottom -- that's right, all the way down! You want to catch that first part of binding in this seam. 
To make the loop, press in the raw edge along the binding tail, then press the other edge to meet the fold. Topstitch to finish.
Wrap the tail into a loop, and tuck it beneath one edge of the binding. Then, fold and pin the rest of the binding in place, and topstitch everything down.
And you're done! 
Checkout the video tutorial as well!
Happy crafting,
Melinda for larougetdelisle
]]>
https://larougetdelisle.com/blogs/doll-tips-and-tutorials/9864868-super-easy-doll-shoulder-bag 2013-11-01T00:00:16-07:00 2018-01-21T15:41:38-08:00 Super Easy Doll Shoulder Bag Melinda Schlimmer

Make this quick shoulder bag for your doll -- she'll love it!

More

]]>


This is really fun -- and it only takes three tiny pieces of fabric!

Special thanks today to Josephine Kimberling, who sent us these awesome fabrics! You can check out the whole collection (it's called "Field Day") at her website: https://larougetdelisle.com/fabrics/field-day/    or at Blend Fabrics: https://larougetdelisle.com/gallery/field-day They're all really fun, so you can't go wrong! I especially love this cherry print -- they look kinda like little hearts and little cherries all at once. And who knew pink and orange was such a groovy color combo? :D 


Anyway, enough being distracted by pretty new fabric. Back to the purse! Start by pressing under 1/4" on the short end of your main body piece.


Fold up the folded edge to make a pocket about 3" deep, then stitch down both sides. Repeat to make an identical pocket in the lining.

Next, stack the two pieces on top of each other, sandwiching the pockets in the middle. Be sure to line up the top of the pockets! Pin and stitch around the edges, starting and stopping at the top of the pocket fold on each side. 

Carefully turn this seam inside out, and press to finish. This will be the flap of the bag. 

Then, flip the main purse body pocket AROUND the lining pocket, trapping all the raw edges between the two pockets.

Pin the two folded edges together, and topstitch them together. Keep stitching all the way around the flap of the bag, then give everything a press to finish.

Strap time!

Press all the edges in 1/4", then fold the strap in half lengthwise and topstitch to finish. 

Pin the strap onto the bag at each side, and carefully topstitch into place. I like to sew in a box around the edges of the strap -- it's sturdier and prettier that way. 

Then, all that's left is to decorate your new bag -- add a button, a piece of favorite trim, or maybe something fun and sparkly! You could also sew on a piece of velcro if you wanted a little extra closing power.

And that's it! Give the bag to your doll and see how she likes it. 

If you end up falling for these new Field Day fabrics, Josephine would love you to mention the name of the fabric line and Blend Fabrics when you show off your finished handiwork -- whether that's in your Etsy shop, or on your blog, or just a "look I made this!" Facebook post, be sure to spread the fun fabric love! 

Happy sewing,

Melinda


Follow along as Melinda shows you how to make the bag!

]]>
https://larougetdelisle.com/blogs/doll-tips-and-tutorials/9813416-how-to-make-a-halloween-treat-bag-for-18-dolls 2013-10-25T09:25:00-07:00 2018-01-21T15:39:54-08:00 How to make a Halloween Treat Bag for 18" dolls FREE Tutorial Cammie Reagan

This week, we round out our mini-Minion costume series with a fun treat bag!

More

]]>

This week, we round out our mini-Minion look-a-like costume series with a fun, quick treat bag made from felt! I added the Gru logo to mine, but it's super easy to adapt to whatever costume you have up your sleeves....

You'll need some felt, ribbon, and embroidery floss. Ready? Let's get started!

If you want an applique, that's easiest to add at the beginning. I used a double sided fusible ("Wonder Under" and "Stitch Witchery" are both pretty easy to find) to add the Gru logo. 

Iron everything into place (following the directions on the package, of course!) 

Next, it's time to start stitching! Lay one side panel underneath the bag's main panel, and blanket stitch along the edge. 

When you get to the bottom, turn the corner and keep going until you've got the whole panel attached.

Add the other panel the same way, then run a blanket stitch along the top edge to finish everything off.

Cut two pieces of ribbon for handles (mine were about 6" long) and stitch those into place.

And...voila! Your doll can carry her goodies in style!

Thanks for joining us! 

Are you a super Minion fan? Looking for the other posts in this Lil' Yellow Costume Series? Find those posts here:


--Melinda

]]>
https://larougetdelisle.com/blogs/doll-tips-and-tutorials/9565855-how-to-make-a-minion-hood-hair-for-18-dolls 2013-10-11T08:39:00-07:00 2018-01-21T15:39:54-08:00 How to make a Hood & Hair like a minion for 18" dolls Cammie Reagan

Ready for the next installment in our Lil' Yellow Costume series? This week, I show you how to give your little minion a fun new hairdo!

More

]]>

No minion costume would be complete without the hair! This week's tutorial will show you how to make an easy hood and add some yarn hair. Let's get started!

You'll need yellow stretchy fabric, some black yarn, and a pencil, paper and ruler.

To get the hood shaped just right, I'll walk you through how to draft a simple pattern. It's not rocket science -- if you can use an eraser, you can do this!

Then, all you have to do is add seam allowance to all the sides of your new pattern, and cut it out.

Let's get sewing!

Sew the two hood pieces together along the long, curved edge (this will become the back of the hood). Then, turn under a 1/4" hem along the face edge, as shown. Stitch down to finish.

To hem the lower edge, fold in each short edge first (#1), then fold up the long edge (#2). Sew along the lower edge of the hood to secure. The folding just might be the slipperiest part of the whole project -- so take your time. :D

Next, sew on a couple tiny pieces of velcro at the bottom corners to hold the hood closed. 

It's hair time! From the right side of the hood, mark where you'd like the hair to go, then add yarn. I used a double strand of black yarn -- but you could use chenille sticks for hair with more volume and body :D

Once you have the hair how you like it, stitch it in position (if you used chenille sticks, you'll probably want to handsew them to avoid damaging your machine). 

Congratulations! Now your little minion has a fun new 'do!

Thanks for joining us! 

Are you a super Minion fan? Looking for the other posts in this Lil' Yellow Costume Series? Find those posts here:

]]>
https://larougetdelisle.com/blogs/doll-tips-and-tutorials/9407251-how-to-make-minion-overalls-for-18-dolls 2013-10-04T09:20:00-07:00 2018-01-21T15:39:54-08:00 How to make Overalls Like A Minion for 18" dolls FREE Tutorial Cammie Reagan

Join us for a posting mini-series as we show you how to make a Minion costume for your 18" doll! This week: overalls.

More

]]>

Guess what? For the month of October, we're planning a posting mini-series on how to make your 18" doll a minion costume! This should be lots of fun -- so be sure to follow along!

Today, I'll show you how to turn the Liberty Jane Mini Skirt pattern into an adorably cute pair of overalls. You'll need lightweight denim fabric, some velcro, two buttons, and (if you want to add the applique on the front pocket), a scrap of black felt.

Start by making up the mini skirt, following the guidebook directions. I added elastic to mine, but feel free to omit it -- since you'll be adding straps, you won't need elastic :)

(Note: If you don't have that pattern you can make a simple skirt by cutting out a rectangle that is 13.5 inches by 5 inches. Sew together the two short ends, hem the top and bottom edges and then proceed with the following instructions.)

Cut two straps, one bib piece, and (if you'd like) a pocket piece, with the dimensions shown above.

Fold the bib piece in half. This fold will become the top of the bib.  Sew down the two sides, as shown; clip the corners and turn the bib right side out. Topstitch around the three finished edges.


Next is the pocket, if you'd like to add one. Start by rounding off two corners of the 2 1/4" square piece. Fold over the top (straight) edge twice, forming a narrow hem, and topstitch.

Applique time! I drew the "Gru" logo on a piece of graph paper, then cut it out to make a stencil. Bond one side of your favorite double-sided fusible (Wonder-Under, Stitch Witchery, &c) to a small scrap of felt, then trace around your stencil onto the paper side. Be sure to flip the image over! 


Cut out your applique, then fuse it to the right side of the pocket.

Fold under the curved edge of the pocket, and pin it to the bib. Topstitch around the edges to finish.

Next, tackle the straps. Press under each long edge and one short edge 1/4". Fold the entire strap in half, and topstitch around the edges.  

Once that's done, sew a small piece of velcro to the finished end of each strap. Sew the corresponding pieces of velcro to the front corners of the bib.

Sew the buttons on the other side of the strap, above the velcro, for a 'faked' button closure. 

Velcro up the straps to the bib, just to double-check everything works as it ought to.

Pin and topstitch the bib to the skirt, being sure to center it. 

Next, try the overalls on your doll; adjust the straps to the right length by tucking the raw ends underneath the waistband. Pin them into place. Don't forget to cross them!

Topstitch everything into place (just for looks, I ran an entire second row of topstitching around the top of the waistband) and, you're done!


Are you a super Minion fan? Looking for the other posts in this Lil' Yellow Costume Series? Find those posts here:

]]>
https://larougetdelisle.com/blogs/doll-tips-and-tutorials/9291591-peek-a-boo-round-2-cutwork-tee 2013-09-27T14:36:43-07:00 2018-01-21T15:41:38-08:00 Peek-a-boo round 2: cutwork tee Melinda Schlimmer

Time for a new tee? Try this fun technique to add some variety to your doll's wardrobe...

More

]]>

Hello all! This week's tutorial is another fun way to spice up an ordinary tee -- peek-a-boo cutwork. It's similar to the technique we showed you earlier (in the Peek-a-boo lacework tutorial) but this version is more of a true reverse applique. Let's get started!

First off, if you need a good pattern for an AG tee, go ahead and download this one -- it's absolutely free!

Next, get your supplies out. All you need is two harmonizing colors of knit fabric, a marking tool (I used a chalk pencil), and your normal sewing equipment.

Time to prepare your pieces! If you're building a tee from scratch, cut everything out, then lay the front piece out flat. (You can also just embellish a ready-made tee, but be sure you can lay the front out flat as well -- it makes things a lot easier!)

Draw on a heart outline, then draw in some slashes. Mine were about 1/4" - 3/8" apart. This isn't rocket science so don't sweat it too much! I re-drew the lines on the image in photoshop, but in real life you want the lines just dark enough so you can see them.

Then, using sharp scissors (or if you're careful, a rotary cutter), cut along the slash lines.


Next, lay the slashed tee front over a piece of the peek-a-boo fabric. Be sure both layers are flat, and pin carefully to keep them from wiggling around.

Stitch along the chalked heart outline, then down the middle of each slash to secure.

Flip the tee front to the wrong side, and trim away the excess peek-a-boo fabric.


And that's it! Go ahead and finish putting the tee together normally -- and then trot out your finished handiwork.

Happy sewing,
Melinda

]]>
https://larougetdelisle.com/blogs/doll-tips-and-tutorials/8853535-fairytale-hideout-make-a-dreamy-doll-canopy 2013-08-30T07:16:42-07:00 2018-01-21T15:41:38-08:00 Fairytale Hideout -- make a dreamy doll canopy Melinda Schlimmer This delightful, easy-to-make, doll-sized hideout is great for backyard adventures! Or, hang it inside to add a little magic to your everyday surroundings....

More

]]>
OK, so how much fun is this?

We made this delightful fairy-esque hideout, and then found a sweet little tree to hang it from -- but yours would probably look just as good over your doll's bed. (No worrying about getting caught in the rain that way either...)


Ready to get started? You'll need a wooden embroidery hoop (mine was 9"), some fabric to be the panels, ribbon of varying widths, and felt.

First, cut your fabric. I did four panels that were each 20" wide x about 30" long, since I wanted this canopy to be good and tall. 20-25" would be a good length for over a bed.


If you're using tulle or a non-ravel fabric, you're good to go! However, if your fabric will fray (like this pretty sheer here), take a minute and serge or zig-zag over the raw edges.

Next, make a casing along one of the short sides. Press under about 1/4", then press under another 1". Pin, and stitch close to the folded edge.


Take the screw out of your embroidery hoop, and set the solid middle sphere aside (save it for another project later!) Thread the panels onto the outer hoop, then put the screw back in to close it.

Next, cut four pieces of narrow ribbon, each about 20" long. Loop one between each curtain using a larks' head knot (pictured); space everything evenly so that the ribbon loops divide the hoop into quarters.

Carefully, tie all the ribbon ends together in a knot, being sure that all the ribbons are the same length. This will help ensure the canopy hangs straight!

Then, cut a piece of wider ribbon and sew it over the knot, to make the loop you'll hang the canopy with.


Cut some petals out of felt (I made eight, but you might want to experiment a bit on your own. Be sure they're long enough to cover the top of the canopy!)  Cut or pierce tiny holes near the top of the petals, then thread them over the hanging loop. Tie another piece of ribbon over the top in a pretty bow.


Find a good place to hang it, then, using some of the leftover ribbon, tie back a couple of the panels and watch the magic happen!


Happy crafting,

Melinda

]]>
https://larougetdelisle.com/blogs/doll-tips-and-tutorials/8774285-back-to-school-art-supplies-tote 2013-08-24T00:00:00-07:00 2018-01-21T15:41:38-08:00 Back to School Art Supplies Tote Melinda Schlimmer  Just in time for back-to-school, make your doll this fun tote to carry all her favorite art supplies everywhere!

More

]]>


Back-to-school is right around the corner! Here's a fun and easy tutorial to make a tote for all your doll's favorite art supplies, so she can take them with her everywhere.

I decided to use a person-sized pad of tracing paper, and cut it down to doll-size; but you can sometimes find little memo pads in the stationery section that are already the right scale.

Now that you have your materials and tote-ables selected, it's time to start sewing!

To give your finished tote a little more stability, use some interfacing on one piece of backing fabric.

Next, prep and attach your pockets.

Then, it's time to add the backing.

Congratulations! Now your doll is ready to make art anywhere!

Let us know in the comments if you make this -- I'd love to see your version!

--Melinda


]]>