https://larougetdelisle.com/blogs/sewing-with-cinnamon.atom larougetdelisle - Sewing With Cinnamon 2023-03-28T14:07:25-07:00 larougetdelisle https://larougetdelisle.com/blogs/sewing-with-cinnamon/hand-sewing-mastery-hand-sewn-buttonholes 2019-07-16T17:30:00-07:00 2023-09-02T18:13:07-07:00 Hand Sewing Mastery - Hand Sewn Buttons, Buttonholes, and Thread Loop Closures Cinnamon Miles Hi Everyone! Welcome to Part 3, Buttons, Buttonholes, & Thread Loop Closures. This week we will be looking at several ways to sew on buttons and several types of closure styles to make them functional. Shari with us again to demonstrate the art of the hand-bound buttonhole, making it look so easy! We'll also be demonstrating how to make a thread loop for your button and the most common ways to sew on buttons themselves.

More

]]>
 

Hi Everyone! Welcome to Part 3, Buttons, Buttonholes, & Thread Loop Closures. This week we will be looking at several ways to sew on buttons and several types of closure styles to make them functional. Shari is with us again to demonstrate the art of the hand-bound buttonhole, making it look so easy! We'll also be demonstrating how to make a thread loop for your button and the most common ways to sew on buttons themselves.

We'll be demonstrating these methods as basic tutorial exercises on small scraps of fabric as well as showing examples on both Liberty Jane and Thimbles and Acorns designs to help illustrate how the basic techniques and methods are used at a smaller scale. Follow along to understand the process, hopefully watching us in action will clarify any concerns or issues you may have with these types of techniques. 

How To Sew On Buttons:


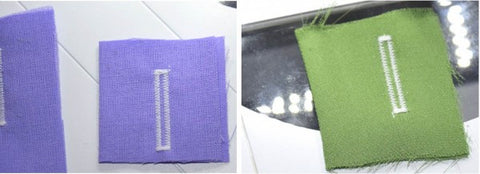
How to Make Hand Sewn Buttonholes with Shari:

Where do you find inspiration? My inspiration for learning how to make hand sewn buttonholes first came from one of my favorite childhood books, Little Town on the the Prairie, by Laura Ingalls Wilder. In the story, Laura took her first job as a seamstress and one of her tasks was to sew buttonholes on shirts. Laura didn't particularly like making buttonholes, so she learned how to make a quick neat job of them. Her precise buttonholes with their tiny knotted stitches impressed her employer who praised her for both the efficiency and quality of her work. If you don't have rows and rows of buttonholes to make every day like Laura did, the easy methodical way hand sewn buttonholes are made can be a rather relaxing and satisfying experience.

While modern sewing machines have made making buttonholes a snap (no pun intended), machine sewn buttonholes aren't the best choice for every application. When working with smaller garments, it can be a lot easier to make hand sewn buttonholes in hard to reach spaces. Hand sewn buttonholes also work better for smaller buttons as they are not only stronger, but you also have more control over the finished size. For historical and heirloom garments, hand sewn buttonholes add an air of authenticity and charm that you simply can not get with machine sewn buttonholes.

Watch the video below to see Shari demonstrate how to make a basic hand sewn buttonhole and download the tutorial page from the SWC Bonuses section, which shows a simple variation of the same technique. You can see a few examples of how buttonholes can be used on a smaller scale on the chemise and drawers from Thimbles and Acorns Victorian Unmentionables pattern.


The Thread Loop Closure:


Suggested Patterns For this Topic: 

  • LJ Abbey Road - hem, armscye bindings
  • LJ Opening Night - lining, thread loop for hook
  • LJ Starlight Gala - lining, hand embroidered embellishments
  • LJ Hello Oscar -  lining, hem, hand embroidered embellishments
  • LJ Sheath Dress - lining hemline
  • LJ Roebuck Bay Top - snaps under buttons
  • LJ Lace Overlay Tank Top - Thread Loop Closure
  • TA Martha - snaps, hem
  • TA Underpinnings - hems, hand sewn eyelets, hand sewn buttonholes
  • TA Fancy Shift - hems
  • TA EnForreau - hems, snaps
  • TA First Impressions - snaps
  • TA Saque Back Gown - hems, snaps
  • TA Bib Front Regency - hems, buttonholes
  • TA Sarah Hale - hems, buttonholes
  • TA 1850s Day Dress - hems, snaps
  • TA 1860 Day Dress - hems
  • TA Bustle Dress - hems, snaps
  • TA Prairie Rose - hems, buttonholes
  • TA Town Girl - hems, buttonholes
  • TA Country Girl - hems, buttonholes
  • TA Mary and Laura - hems
  • TA Carrie - hems, snaps
  • TA Waterfall Bustle - snaps
  • TA Sweet Sashay - snaps
  • TA Hunting Frock - Thread Button Loop
  • TA Charlotte - hand sewn buttonholes 


Week Three Task:

  • Watch the three videos. Practice these techniques on a piece of scrap fabric, or on a garment you have ready to finish.
  • Be sure to download the PDF that goes along with the hand Sewn Buttonhole video. It's in the SWC Bonuses section.
  • Check out the Ultimate Resource Guide for fabric and supply sources. (Find this in the SWC Bonuses section)
  • Jump over the SWC Facebook Group for conversation and project sharing.
]]>
https://larougetdelisle.com/blogs/sewing-with-cinnamon/hand-sewing-mastery-how-to-apply-sew-on-snaps 2019-07-09T17:30:00-07:00 2023-09-02T18:13:08-07:00 Hand Sewing Mastery - How To Apply Sew On Snaps Cinnamon Miles Hi Everyone! Welcome to Part 2, How to apply sew-on snaps. This week we have Shari with us to present a few techniques for working with these tiny closures!

Snaps are one of the most user-friendly closures for doll clothes as they are easy to fasten, don't get snagged on doll hair, and can be used just about anywhere a fastener is needed.

More

]]>
 

Hi Everyone! Welcome to Part 2, How to apply sew-on snaps. This week we have Shari with us to present a few techniques for working with these tiny closures!

Snaps are one of the most user-friendly closures for doll clothes as they are easy to fasten, don't get snagged on doll hair, and can be used just about anywhere a fastener is needed. Although their simple sew-through design should make them as easy to apply as a basic button, they are rather slippery and can be a bit of a bugger to handle. Smaller snaps, in particular, have a tendency to shoot out from between your fingers like watermelon seeds. 

Most snaps have a tiny little hole in the center of each piece that you can stick a pin through to hold the snap in place while you sew. While this is helpful in keeping your snap from flying off, it can make the process of sewing a bit more “fumbly” as you try to avoid poking yourself on the pin. I recently hit on a method for sewing snaps that is both quick and easy - and painless since it doesn't require any pins. In the videos posted below, I will show you how to use this method to sew on each side of a snap as well as how to sew a snap under a decorative button.

Snaps can almost always be used interchangeably with buttons or hook and loop tape. Simply choose snaps that are the same size or slightly smaller than the recommended button size. When the size is not indicated, a size 1 or 0 (3/8-inch or 8-10 mm) snap is generally a good choice for doll clothes. Smaller snaps are not as strong as larger snaps, but if you need your snaps to be less conspicuous you can usually use a smaller size such as size 3/0 or 4/0. Just be sure to use the recommended size snaps at higher stress points such as waistbands.

    We'll be demonstrating these methods as basic tutorial exercises on small scraps of fabric as well as showing examples on both Liberty Jane and Thimbles and Acorns designs to help illustrate how the basic techniques and methods are used at a smaller scale. Follow along to understand the process, hopefully watching us in action will clarify any concerns or issues you may have with these types of techniques.


    Suggested Patterns For this Topic: 

    • LJ Abbey Road - hem, armscye bindings
    • LJ Opening Night - lining, thread loop for hook
    • LJ Starlight Gala - lining, hand embroidered embellishments
    • LJ Hello Oscar -  lining, hem, hand embroidered embellishments
    • LJ Sheath Dress - lining hemline
    • LJ Roebuck Bay Top - snaps under buttons
    • TA Martha - snaps, hem
    • TA Underpinnings - hems, hand sewn eyelets, hand sewn buttonholes
    • TA Fancy Shift - hems
    • TA EnForreau - hems, snaps
    • TA First Impressions - snaps
    • TA Saque Back Gown - hems, snaps
    • TA Bib Front Regency - hems, buttonholes
    • TA Sarah Hale - hems, buttonholes
    • TA 1850s Day Dress - hems, snaps
    • TA 1860 Day Dress - hems
    • TA Bustle Dress - hems, snaps
    • TA Prairie Rose - hems, buttonholes
    • TA Town Girl - hems, buttonholes
    • TA Country Girl - hems, buttonholes
    • TA Mary and Laura - hems
    • TA Carrie - hems, snaps
    • TA Waterfall Bustle - snaps
    • TA Sweet Sashay - snaps
    • TA Hunting Frock - Thread Button Loop
    • TA Charlotte - hand sewn buttonholes 


    Week Two Task:

    • Watch the Sew On Snaps Part 1 and Part 2 videos. Practice these techniques on a piece of scrap fabric, or on a garment you have ready to finish.
    • Watch the Sew Snaps Under Buttons video. Practice this technique a few times.
    • Check out the Ultimate Resource Guide for fabric and supply sources. (Find this in the SWC Bonuses section)
    • Jump over the SWC Facebook Group for conversation and project sharing.


    ]]>
    https://larougetdelisle.com/blogs/sewing-with-cinnamon/simple-closures-eyelets-and-lacing 2017-05-23T22:00:00-07:00 2023-09-17T18:40:29-07:00 Simple Closures - Eyelets and Lacing Cinnamon Miles

    Hi Everyone! We round out this months topic with a closer look at using eyelets to create a lace up closure... Similar to buttonholes, eyelets may seem a bit intimidating. Cutting a hole into your almost finished garment is always a bit nerve-racking but with a few careful preperation tips you'll be able to apply these with confidence! Watch the video below for a full tutorial on how to use and eyelat setting tool called a Crop-o-dile to add eyelets to your garment.

    More

    ]]>

    Hi Everyone! We round out this month's topic with a closer look at using eyelets to create lace-up closure... Similar to buttonholes, eyelets may seem a bit intimidating. Cutting a hole into your almost finished garment is always a bit nerve-racking but with a few careful preparation tips, you'll be able to apply these with confidence! Watch the video below for a full tutorial on how to use and eyelet setting tool called a Crop-o-Dile to add eyelets to your garment.


    Pattern Overview: For this week's topic, you can choose to sew with any pattern you already have that has a closure designed without an overlap, like an invisible zipper, button loop, or lace-up eyelet closure. This topic goes along with the latest pattern release from Liberty Jane - The Outback Libby Mindil Beach Dress!


    Below you'll find a list of the Liberty Jane patterns shown in the video that highlight the specific types of closures mentioned.


    Resources (where to buy - links point to amazon):


       Week Four task:

      • Sew a garment using a lace up eyelet closure. The new Mindil Beach Dress pattern is a great one to use this technique on.
      • If you have the LJ Blossom dress pattern or Get The Look dress pattern (both have been free several times) you can use the bodice pieces to make a simple corset that laces up the front. Here's a link to that bonus tutorial: Until Twilight Corset Tutorial
      • Post questions as comments under this Facebook Group Post - please preface your question by stating the closure product used, the pattern used, and step number you're on. Post finished projects as well  - we'd love to see them!
      ]]>
      https://larougetdelisle.com/blogs/sewing-with-cinnamon/simple-closures-buttonholes 2017-05-16T22:00:00-07:00 2023-09-17T18:42:21-07:00 Simple Closures Buttonholes Cinnamon Miles

      Hi Everyone! I'm sure many of us have a fear of sewing buttonholes. That moment when you've sewn up your entire garment, hours of meticulous attention to detail, it looks perfect, you're so excited, then you relize the final step could literally destroy your entire piece! What to do, do you dare try to sew those buttonholes by machine, should you just go with snaps? Oh the torture! Haha, just kidding(well a little bit!)...

      More

      ]]>

      Hi Everyone! I'm sure many of us have a fear of sewing buttonholes. That moment when you've sewn up your entire garment, hours of meticulous attention to detail, it looks perfect, you're so excited, then you realize the final step could literally destroy your entire piece! What to do, do you dare try to sew those buttonholes by machine, should you just go with snaps? Oh, the torture! Haha, just kidding(well a little bit!)...

      This week we have a fun treat! Shari Fuller, the designer behind the Thimbles and Acorns brand, is going to share her amazingly cool buttonhole sewing tip with us! After trying this, I'm pretty sure you'll never go back to your old method - seriously!  I also have a few tips and techniques from some other talented seamstresses. My hope is that you will walk away with the confidence to sew professional looking buttonholes with confidence!

      But first... If you're new to sewing buttonholes with an automatic buttonhole foot attachment on your sewing machine, be sure to check out my Simple Closures Video 3.3 from the Sewing Academy series (password: PixieFaire), it includes a full tutorial showing how to install and use a button hole foot beginning at 8:45. I also demonstrate how to open up the buttonhole successfully without accidently cutting through the threads beginning at 14:29


      Now on to the tutorial from Shari Fuller!  Watch the Freezer Paper Buttonhole video below. 


      Or follow along with the full tutorial here:

      For many sewers, the thought of adding buttonholes to a finished outfit is enough to send chills down their spine… it does for me.  The thing is, it isn’t terribly difficult to make buttonholes, especially if your machine has a one-step buttonhole feature.  The problem is more about placement.  A slightly crooked or offset buttonhole can ruin the finished look of an otherwise masterfully sewn outfit… and it is nearly impossible to remove a buttonhole without damaging the fabric.

      The key to beautiful buttonholes is to carefully mark all your placement lines so you can get them right the first time.  Transferring markings directly onto fabric, however, isn’t always as easy as it seems… which is probably why we are tempted to take shortcuts we inevitably regret.  Markings can be difficult see on dark or printed fabrics, and it can be difficult to remove markings from lighter fabrics.  This is where the freezer paper comes in, the white paper is easy to write on and easy to see, and when you are finished, you just peel it off without a trace!

      To begin, gather your project, freezer paper, buttonhole foot, pen, ruler, scissors, rotary cutter (optional), and an iron.

      1. Measure the width of your buttonhole foot.

      2. Cut a strip of freezer paper the same width as your buttonhole foot.

      3. Draw a line down the center of the strip of freezer paper.

      4. On a scrap piece of fabric, make a sample buttonhole that fits the buttons you will be using in your project.

      5. Measure the length of your sample buttonhole.

      6. Using the measurement of your sample buttonhole, determine the buttonhole placement on your project and transfer the placement marking to the center line on your strip of freezer paper. The top of the strip should line up with the top edge of your project. Don’t forget to figure in the seam allowance when determining the placement of the first buttonhole. For doll clothes, I like the top button to be 1/4-inch from the finished edge, so the marking for the top buttonhole should be 1/2-inch from the top of the freezer paper to allow for the 1/4-inch seam allowance.

      7. Fold the freezer paper strip in half along the center line. Trim the excess length of the bottom, leaving about 3-inches to help center the template under the buttonhole foot.

      8. Snip the ends of each buttonhole marking 1/8-inch in from the folded edge…

      … then snip out the center of each buttonhole.

      Your finished template will look like this.

      9. With the plastic side down, position the freezer paper template on you project. The top edge of the template should match the top edge of the project. Use the center line of the freezer paper to help with the alignment. Press the freezer paper so that it adheres to your project.

      If you are unsatisfied with the alignment, simply peel the freezer paper up, reposition it, and press it in place again.

      10. Starting with the bottom buttonhole, position the template so that the needle lands at the bottom edge of the buttonhole opening. Adjust the template so that the side edges are aligned with your buttonhole foot and the center line runs down the center of the buttonhole foot. Stitch your buttonhole. Repeat this process for the rest of the buttonhole, working from the bottom up.

      When you are finished, peel the freezer paper template from your project. If you are careful not to tear it, you can reuse this template several times.

      Look, beautiful, straight, and even buttonholes! (…though, I wouldn’t suggest using white thread on read fabric)

      While this tutorial demonstrates how to make a template for simple vertical buttonholes, the concept can also be used for horizontal and arbitrarily placed buttonholes as well.   Instead of cutting a strip the same width as your buttonhole foot, cut a wider strip or template that will accommodate the buttonhole placement and draw guidelines on the freezer paper for your buttonhole foot.

       Thanks, Shari! This is a fantastic resource!

      More Tips & Tricks for Sewing Buttonholes:

      Here's another great tip from Jessica over at the Running With Scissors blog. "When sewing a bunch of buttonholes, I've started using masking tape... The tape makes the start and stop markers, and then it's really easy to just draw a top and bottom buttonhole, then figure out the equidistant other buttonholes in between."

      Many of you may know this already, but the secret to flat smooth buttonholes is interfacing! This post from the We All Sew Blog has some great tips and instruction for sewing buttonholes on cotton, silk, and even knit fabrics! Be sure to bookmark this one too! "Tip: Use an interfacing that compliments the weight of your fabric! The difference when sewn with the proper interfacing, stabilizer of backing is like night and day." (See example pics below)

      Interested in sewing butonholes by hand? This may sound daunting, but this could be a great alternative to using a automatic buttonhole foot. This technique will allow you to have tiny buttonholes for 1/4" buttons, on a narrow placket or clost to the edge of the opening!

      The buttonhole stitch is a great one to master and have in your book of secrets! This tutorial is by Tasha from the By Gum, By Golly vintage sewing blog and it's pretty amazing! Check it out here - https://larougetdelisle.com/2013/09/buttonholes-by-hand-vintage-sewing/


      Pattern Overview: For this topic, you can choose to sew with any pattern you already have that is designed to use functional buttonholes. Below you'll find a list of the Liberty Jane that use buttonholes. Shari is demonstrating her technique on the Civil War Boy Shirt (tutorial) and Union Suit (video).

      Week Two Assignment: Time to practice what you've learned! After you watch the video, try to technique shown. Post your projects in the Facebook Group - we'd love to see what you've made!

      Resources:

      • Freezer Paper - pretty much anywhere :)
      • Buttonhole foot  - gather your machine type and model and search online. If you have trouble, just let me know. I can check with our friends at Quality Sewing (they can pretty much get any part for any machine).
      • A good steam iron and pressing board.

        Next Tuesday  - Week 4: Eyelets and lace up closures - tips and tricks for success!


        ]]>
        https://larougetdelisle.com/blogs/sewing-with-cinnamon/simple-closures-button-and-loop-closures 2017-05-09T22:00:00-07:00 2023-09-17T18:44:40-07:00 Simple Closures - Button and Loop Closures Cinnamon Miles

        Hi Everyone! This week is packed with tips and tricks for sewing buttons with loop closures!

        More

        ]]>

        Hi Everyone! This week is packed with tips and tricks for sewing buttons with loop closures! In the video below, I'll show you how to do three different types (the time stamp to get to each one is provided below).

        • 2:05 How To Sew a Thread Loop (for a button or a hook)
        • 12:05 How to Sew Fabric Loops
        • 25:56 How to Make Your own Frog Closures! (Thanks for the suggestion - Bee!) 

         Watch the video below. 


        Pattern Overview: For this topic, you can choose to sew with any pattern you already have. Below you'll find a list of the Liberty Jane patterns either shown in the videos or ones that highlight the specific types of closures mentioned.

        Week Two Assignment: Time to practice what you've learned! After you watch the video, play around with one (or all) of the techniques mentioned. Post your projects in the Facebook Group - we'd love to see what you've made!

        Resources (links go to Amazon):

        • Soutache Braid Trim -  This trim type can be used to make the frog closures or tiny trim loops. You can find this type or trim at any fabric or craft store, as well as fabric.com
        • Other tools for turing narrow spaghetti straps would be: A bobbi pin (shown in the LJ Maxi Dress Pattern), A Bodkin Turning Tool Dritz or Clover.
        • You can find 1/4" Steam-A-Seam Lite or 1/4" Pellon® Lite EZ-Steam pretty much anywhere sewing supplies are sold. You can use this product on any seam that needs stabilization that doesn't need stretch. We use this in all our Janes shoe patterns too!

          Next Tuesday  - Week 2: Buttonholes - tips and tricks for success!


          ]]>
          https://larougetdelisle.com/blogs/sewing-with-cinnamon/simple-closures-topic-overview 2017-05-02T22:00:00-07:00 2020-09-24T21:52:51-07:00 Simple Closures - Topic Overview Cinnamon Miles

          Hi Everyone! Are you ready for a deep dive into the topic of "simple closures"? Throughout this month long topic I'll share with you my tips and tricks for working with a variety of closures such as: hook and loop tape, buttons, buttonholes, eyelets, and more...

          More

          ]]>

          Hi Everyone! Are you ready for a deep dive into the topic of "simple closures"? Throughout this month long topic I'll share with you my tips and tricks for working with a variety of closures such as: hook and loop tape, buttons, buttonholes, eyelets, and more... Watch the video below for an overview of the month long topic. You can also see a bit more general info about Simple Closures in the Sewing Academy Part 3.3 Video (password for viewing site: PixieFaire). This was included in your sign up bonus!


          Pattern Overview: For this topic, you can choose to sew with any pattern you already have. Below you'll find a list of the Liberty Jane patterns either shown in the videos or ones that highlight the specific types of closures mentioned.


          Week One: To kick off the topic of simple closures I wanted to share with you a few tips for working with hook and loop tape. We've used a variety of types over the years and have come to love the Velcro® Brand Qwik Tie or One-Wrap Tapes. Not only are they thinner than the standard packaged velcro that you can buy locally (or at big box online stores), but they are two sided providing a built-in stabilizer for easy application!

          Watch the video below:


          Resources (where to buy):

          • Currently, you can find a mixed color 3 yard bundles of hook and loop tape at larougetdelisle. We have the  Color Variety Bundle available. This roll can be cut in half lengthwise to create both the left and right side pieces.
          • You can also find Velcro® Brand Qwik Tie Tape (the ultra thin stuff in both black and white) at Zipper That Doll (1" wide, must be cut narrower)
          • Or Velcro® Brand One Wrap Reusable Cable Tie packages (multi color 8" long strips)
          • You can find 1/4" Steam-A-Seam Lite or 1/4" Pellon® Lite EZ-Steam pretty much anywhere sewing supplies are sold. You can use this product on any seam that needs stabilization that doesn't need stretch. We use this in all our Janes shoe patterns too!

          Resources (other tips & tricks):

          • A glue stick can be used in place of double sided fusible tape. It won't gum up the needle and keeps the velcro in place while sewing. This also works great for zippers!
          • Use thread that matches your velcro to keep it clean and professional looking. 
          • Use specific scissors for trimming/cutting the hook and loop tape so you don't dull your fabric scissors!

           Week One task:

          • Sew a garment using a hook and loop tape closure. If you haven't tried the tips mentioned in the video, give them a try and test the difference they make. If possible, test out using different types to see which type you prefer most.
          • Post questions as comments under this Facebook Group Post - please preface your question by stating the closure product used, the pattern used, and step number you're on. Post finished projects as well  - we'd love to see them!

          Next Tuesday  - Week 2: Buttons used with loop closure...


          ]]>