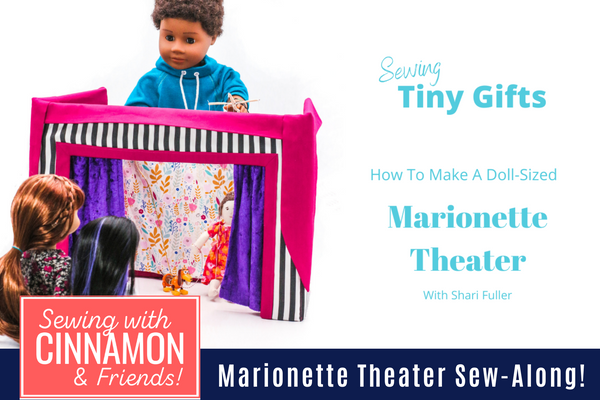
Hi Everyone! In Part 4 we wrap up the topic, Sewing Tiny Gifts, with a special treat! Shari is here to show is how to create a doll-sized Marionette Theater. Follow along and create one for your collection too!
When I was a kid, my grandpa gave me and all my cousins marionettes for Christmas. We LOVED them. It was so much fun trying to get them to walk, wave their hands, and even dance. We created a makeshift theater by throwing a blanket over my bed and spent most of the day creating little plays and putting on shows for our parents and grandparents.
In this tutorial, I am going to show you how to make a doll size marionette theater. It is definitely a step up from a blanket over a bed and just the thing for your kids and their favorite doll to entertain themselves and everyone else during the holidays and beyond!
The pattern is available separately here: Thimbles and Acorns Marionette Theater
Once you have your theater made, it's time to get your marionette puppets strung up and ready to go! You can use any of the Cute Felt patterns or the two mini dolls, Charlotte and Pandora. Choose your desired handles and create your play!
New Years Eve is the perfect day to set up your new theater and perform your puppet show!
Here are a few other things to get you ready for your New Year's Eve celebration too:
How to Make Doll-Size Sparklers
How To Make A Doll-Sized Checkerboard
]]>
In Part 3 we continue with the theme, Sewing Tiny Gifts, featuring the Cute Felt Patterns collection of mini doll and animal stuffies! Follow along as I show you how to make the Kitty Kitty set in the tutorial video. It's a fun and easy project, perfect for working on those hand sewing skills! Make tiny stuffies to pop in stockings or to fill your dolls rooms with new toys!
Resources:
I mentioned the Benzie website int he video, I've purchased their wool felt sets and have been so impressed worth eh quality and the beautifully coordinated thread! They have a website as well as collections available on Amazon.
The patterns featured in the video:
Cute Felt Patterns (The full collection)
Cathy (free)
Mini Cloth Doll patterns (from Thimbles and Acorns:
Be sure to check out the follow-up post, The Marionette Theater Sew-Along! Making these cute dolls as marionette puppets is the icing on the cake!
]]>
In Part 2 we have a special treat! Donna Kinley is joining us to share sew-along tutorial for a darling little fabric ball. Follow along as she demonstrates how to choose your fabrics, prep your supplies, and create a ball perfect for gifting!
In this course, we are talking about gifts for our dolls. What doll wouldn’t love to have a new ball? Especially one they can play with inside the house!
I’ve been making this style of ball as a gift for many years. When my children were in elementary school, I made some for their classrooms, for use inside on rainy days. The kids loved playing dodge ball with them.
Now, the dolls can play too! Nonni’s Baby Ball pattern contains four sizes ranging from about 3 inches to about 9 inches in diameter. The smallest ones work well for dolls, and kids of all ages can enjoy any of them.
There are only a few supplies used in this project -- fabric, stuffing, and thread.
The equipment and tools you’ll want to have handy are:
For the fabric, quilting type cotton works well. Each size ball only has two pattern pieces, but you’ll need to cut a total of 12 of each one, so it’s a good idea to print multiple pages of the size you need. Having multiple copies of the pattern pieces really helps in figuring out an efficient layout.
After the pieces are cut out, they get stitched, stuffed, and tied together to form the ball. Follow along as we go step by step through making this fun toy. I’ll be making the size small, but the process is the same for all sizes.
There are several ways to turn this ball into an educational toy. You could use prints to teach basic shapes or use basic colors for a color learning toy. You can create an “I Spy” type game by using various random prints. You could even try using various textures of fabrics to create a tactile sensory learning tool.
Use team colors to create a gift for your favorite sports fan or create some room décor by using the largest size ball made in fabrics that coordinate with the bedding… Sure to come in handy for sleepover pillow fights.
I hope you’ll give this ball a try and have some good old-fashioned fun playing with it!
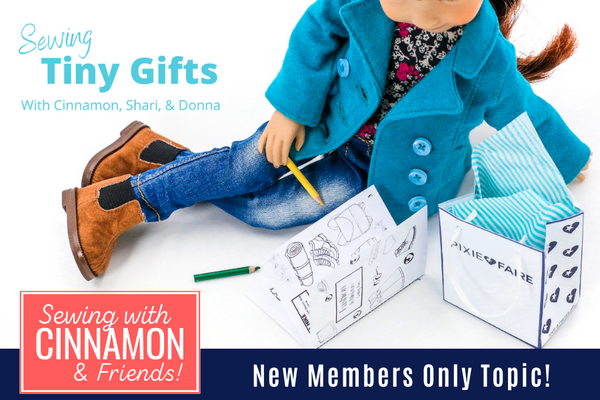
]]>Hi Everyone! It’s holiday time and you know what that means… Gifts! In this topic we explore a few gift making ideas at a smaller scale. Tiny things that dolls can give to other dolls. There are so many great ideas out there, but we’ve narrowed it down to a few that we’re really excited to share with you!
I’ll be joined by both Donna Kinley and Shari Fuller too! I’ll kick things off with a few crafty printable, perfect for gifting and perfect for packing tiny gifts in! Donna is going to share a tutorial for a creatively constructed tiny toy - Nonni’s Baby Ball - and the fun part is it can be for kids or dolls! Shari is going to share with us a tutorial for a doll scale Marionette Theater and I’ll join her with a tutorial for puppets! Then we’ll finish things off with a few crafty projects to make your New Year’s celebration fun & festive too!
This topic is going to be a blast, filled with fun & easy projects that add something special to the holidays! Join us and we can Sew and Create Tiny Gifts together!
The topic will be divided into four parts:
This course features several patterns that you can find on larougetdelisle.
Let's get started with our fun & easy printable craft project! Follow along in the video below:
]]>Hi Everyone! This week we wrap up the topic (literally!) with a look at packaging and presenting the gift or product in special and unique ways. We began this month with setting a goal, then gathering ideas to personalize the project, and last week finding tiny treasures to accessorize and complete the look, Now we get to bring it all together and think through how to present it to the recipient, or even to a customer if you plan to sell the items too!
Before we get started - let's do this week's giveaway!
But first... The winner of last week's giveaway (the Tiny Treasures) is Sue Z. Congrats!! You have been contacted by email and your prize will be on its way shortly! Thank you to everyone who entered! The feedback you've provided is amazing and super helpful as we plan for 2020!
This week the giveaway if for a $50 gift card from one of my most favorite places to shop for paper, trinkets, office supplies, and more - Paper Source! I have the store available to me locally, but they also have an online site, so you can shop from them from anywhere. Maybe you've wondered where I've found the background papers that we use for our Instagram flat lay outfit pics - it's Paper Source. They have a full wall if single sheet papers, heavy weight, in darling prints, solids, seasonal and more. They also have trinkets like the "Worlds Smallest" items, tiny books, party hats, and so much more!
I love to gather up all my gifts and have a "wrapping party", which is just me by myself, with a pile of gifts, a frothy latte, and the holiday music playing in the background to set the mood! How about you? Comment below by answering this question - "What is your favorite Holiday song or album?"
The giveaway will close on Saturday, November 30th. I'll announce the winner on Monday, December 2nd in this post! The winner will be chosen at random from the comments posted under this blog post. One entry per person.
Good luck!
- - - - - - - - - - - - - - - - - - - - - - - - - - -
Ok, now let's talk about packaging, adding labels, branding, and presentation!
You've worked hard to make your items, now let's talk about the finishing touches! Packaging and branding are so important as you think through how to pass along your hand made items. Whether you sell them or plan to give them as gifts, you should plan to "Wow!" the recipient with beautiful packaging! Including things like a handwritten notecard, logo stickers, boxes or bags; logo tags sewn into your items, and a few added ribbons or hanging tags are all great ideas. Remember that you only get one chance to make an unforgettable first impression and if you do it well, they will be coming back for more (and possibly tell their friends!)
Resources For Packaging Supplies:
Tutorials for making your own sew-in labels:
- - - - - - - - - - - - - - - - - -
Packaging images are sourced from Pinterest. The shoe box images are from the Genniwren Braided Sandals Pattern (comes with a shoebox template).
Shop The Liberty Jane Pattern Collection Today!
Week Four Task:
]]>
I invite you to follow me (& Jason) along as we go on the hunt for tiny treasures!
]]>Hi Everyone! This week I'm going on a mini treasure hunt and I'm taking you along with me - Yay! This is the perfect time of year to find miniature props and accessories at great prices. The perfect pieces to accessorize your outfits or add to your doll rooms, scenes, and settings!
I invite you to follow me (& Jason) along as we go on the hunt for tiny treasures!
Now let's do this week's giveaway!
But first... The winner of last week's giveaway (the Liberty fabrics) is Lori N. Congrats!! You have been contacted by email and your prize will be on its way shortly! Thank you to everyone who entered! The feedback you;ve provided is amazing and super helpful as we plan for 2020!
While on my treasure hunt, I picked up a few items especially for this week's giveaway! A fun set of Christmas baking-themed items: Cookie sheet with decorated cookies, a rolling pin, a whisk, a box of truffles, and a mini Starbucks cup!
Comment below by answering this question - "Do you sew as a hobby or business, and what is your biggest struggle you'd like to overcome?"
The giveaway will close on Monday, November 25, 2019. I'll announce the winner on Tuesday, November 26th and kick off the next giveaway! The winner will be chosen at random from the comments posted under this blog post. One entry per person.
Good luck!
- - - - - - - - - - - - - - - - - - - - - - - - - - -
Ok, now back to the topic of finding mini treasures!
Here's my list of places to shop:
This is a great place to browse online, unless you happen to live close to the Magnolia Silos in Waco, TX.
I visited The Magnolia Silos shop last year and picked up several holiday ornaments that are perfect for the 18" doll size. I found a Demo Day Hammer, Mini Distressed White Dishes (now they have teapots), Tin Watering Can, Canteen, and a Mini Wreath! Most of these things are still available on their website, plus some new items like mini teapots and mugs! Here are a few examples to show the scale:
Oh! And... it looks like if you go totheor website you'll see a popup to sign up for thier newslatter and get a 15% off coupon, plus they have free shipping on orders over $49...
Check stores like Target, Marshalls, Claires, Kate Spade, Michael Khors, and Coach for mini keychain purses. eBay is also a great place to find these! The sled and stocking were found at Hobby Lobby.
Another fun item that is available right now is the "Mini Brands" mystery toy. I've seen these at Walmart, but only in person, not online. They are around $5 in person, and if you happen to see them online, the prices are quite high. They are filled with tiny mini replicas of real brands. They're super cute! I picked up a few and have used them in some of our photos.
- - - - - - - - - - - - - - - - - -
]]>
To kick things off, let's do the giveaway...
]]>Hi Everyone! This week we have two fun things to talk about - Personalizing your project and a fun giveaway to enter! Sounds fun, right?
To kick things off, let's do the giveaway! (giveaway ended on 12/2019)
This past summer I had the opportunity to visit London. It was an amazing trip filled with site seeing, shopping and spreading the word about Sew Powerful at the Birmingham Quilt Festival! While I was there I visited the Liberty London flagship store! It was breathtaking, to say the least!
While I was there, I visited Liberty Fabrics up on the top floor! Wow! So many amazing fabrics! It was hard to pick just a few to bring back home with me!
This week, I'm going to share my splurge purchase with one of you! The giveaway for this week is for two 1/3 yard cuts of Liberty cotton lawn, and one adorable London theme print.
Comment below by answering this question - "What course topics or specific techniques would you like to see us present in 2020?"
The giveaway will close on Monday, November 18th. I'll announce the winner on Tuesday, November 19th and kick off the next giveaway! The winner will be chosen at random from the comments posted under this blog post. One entry per person.
Good luck!
- - - - - - - - - - - - - - - - - - - - - - - - - - -
Ok, now onto the topic for part 2 - Personalizing your project!
There are several ways to really make your item special! Now it's time to refer to your project planner worksheet and look for ways to integrate the information you've collected.
I'm going to share a few ideas below, gathered from some online inspiration. Then I'm going to pull some instructional content from our video library for the specific techniques to add those elements to your projects.
1. Create a look to match their favorite character, from a book, movie, fairytale, or even a drawing!
The examples posted below are from the Janie and Jack website. They just launched a campaign of fashions inspired by iconic women featured in a new children's book!
In this concept, they're selling the matching children's clothing. For our purposes, I'm using this example to illustrate matching a character for the doll clothes item. The key elements are color, special attention to design elements (like the ruffle bell sleeve on the black dress), and of course the props and accessories. We'll go into the accessories in greater detail next week - stay tuned for that!
The pattern selection for many of these types of ideas is usually pretty basic. The personalization comes from fabric choices and colors!
2. Add embellishments that highlight their love of a specific animal!
In these examples, you can see how simple applique shapes and stitching add to the charm of these basic designs.
Does she love kitties? ThesePJss would be perfect! Animal print knit and a few fabric shapes, create a cute kitty-themed set!
Maybe it's a polar bear or any other cuddly furry animal... In this example, a half-circle sewn on top of the bottom of the shirt with a few added details (eyes ears, and nose) and you have a darling personalized top! Take it one step further and use a fuzzy fleece for the face and glittery fabrics for the nose!
3. How about a favorite color?
In the example below, you can see how they took a classic item, the denim jacket, and created a super girly style! Adding pink sleeves and hood are an easy way to create something special for someone who loves pink. What about rainbows (or hearts, stars, and flowers)? The painted element on the back of the jacket is a super cute "surprise" design element! You can achieve this look with fabric paint, hand made applique or a prepurchased iron on.
4. Add a saying or quote that is special to the recipient!
The "Let it Snow" Piccadilly PJs show this example with the use of a design we created on an electronic cutting machine. Once it's designed int he software, it is cut from a purchased roll of heat transfer vinyl. This is super easy to do once you have a machine and learn to use it.
You can also do this with premade purchased designs, but they might be harder to find in the proper scale.
- - - - - - - - - - - - - - - - - -
]]>
Hi Everyone! It's November and time to talk about Sewing For The Holidays! This month I invite you all to a month-long sewing party - yay! Together we can plan our projects, set goals, do a few giveaways, and have a fun time while doing it all together!
The topic, or should I say "party" will be divided into four sessions:
It's going to be a fun course! Are you ready? Let's go...
Holiday Shopping Resource Guide:
Fabric.com has some cute holiday flannels, perfect for PJs!
]]>