https://larougetdelisle.com/blogs/sewing-with-cinnamon.atom larougetdelisle - Sewing With Cinnamon 2023-03-28T14:07:25-07:00 larougetdelisle https://larougetdelisle.com/blogs/sewing-with-cinnamon/hip-hip-beret-how-to-resize-a-hat-pattern-for-any-doll 2020-12-22T09:03:31-08:00 2023-09-02T18:11:12-07:00 Hip, Hip, Beret! How To Resize A Hat Pattern For Any Doll Cinnamon Miles Hi Everyone! In Part 4 we wrap up the topic with a look at resizing a hat pattern to fit any other size doll! Shari is joining us again with a detailed tutorial to demonstrate how it's done.

More

]]>
Hi Everyone! In Part 4 we wrap up the topic with a look at resizing a hat pattern to fit any other size doll! Shari is joining us again with a detailed tutorial to demonstrate how it's done.

As a reminder, all of the coupon codes, download links, and monthly bonuses can be found in the Sewing With Cinnamon Bonuses section.

Did you know you can easily customize the size of just about any fabric hat pattern to fit your favorite doll? Because there is only one key measurement,
the head circumference, it is as easy as 1, 2, 3... plug a few numbers into a simple math equation, reset the scale on your copy machine, and redraw the seam allowances. Seriously, it is as easy as that!

Special note: This works for a hat because there is only one measurement to consider. This same process does not work for clothing patterns because there are generally two measurements to consider (height and width) so the scaling process takes a little more finesse to get just right!

Here's Shari to explain the process in detail:


Here's a breakdown of the full tutorial:

Step 2:
Reset the Scale to Print Your Pattern

  • To resize your hat pattern (from 18" to 14.5"), simply click to print your PDF, choose the pages with your pattern pieces, and then adjust the custom scale to 77.08%.... or whatever percentage you came up with for your project. 


Step 3:
Redraw your Seam Allowances

  • The seam allowances will be rescaled in the printing process, so they will need to be adjusted to the correct width.
  • Using the stitching line as a guide, measure out ¼” to mark the new cutting line.
  • You can either use a ruler and a pencil to draw the new cutting lines OR you can take the thread off your sewing machine and use your seam guide to stitch the new cutting lines.


There you go, that's it! Your resized pattern is ready to sew.

    ]]>
    https://larougetdelisle.com/blogs/sewing-with-cinnamon/sewing-with-wool-the-classic-peacoat-pattern-hack 2020-11-24T07:58:33-08:00 2023-09-02T18:11:16-07:00 Sewing With Wool - The Classic Peacoat Pattern Hack Cinnamon Miles Hi Everyone! In part 4 we switch things up a bit and experiment with a new pattern hack. This design idea simplifies the coat with a streamlined back removing the pleated section. Now, I know this is one of the cutest design elements, but maybe you'd like a simple coat for every day or a coat that works for a boy doll too! This hack is easy to do, follow along and watch the process, then you can try it out on your own!

    More

    ]]>
    Hi Everyone! In part 4 we switch things up a bit and experiment with a new pattern hack. This design idea simplifies the coat with a streamlined back removing the pleated section. Now, I know this is one of the cutest design elements, but maybe you'd like a simple coat for every day or a coat that works for a boy doll too! This hack is easy to do, follow along and watch the process, then you can try it out on your own! Or you can wait a day or two and get the pattern pieces as a download :)

     Piccadilly Peacoat Pattern Hack: The Classic Peacoat


    Ready to get started? For this design we will use all of the pattern pieces except for the Back Skirt. We will be replacing the Back, Side Back, and Lining with modified pieces.

    Here's a breakdown of the process to create the new pattern pieces:

    • Cut out and set aside all of the pattern pieces except for the Back, Side Back, and Back Lining. The Side Front is used as a guide.
    • Get your pattern drafting supplies - Graph paper or tracing paper, pencil, acrylic design ruler, and removable tape. A Light Board is a great tool too!
    • Place the Side Back on the graph paper. Mark the new length by setting the Side Front next to it to determine the new hemline.
    • Trace the new Side Back side seam to match the curved shape of the Side Front.
    • Create a gently curved princess seam line for the opposite side. Draw the stitching lines to finish the piece.
    • Place the Back piece on the paper, lined up with the armscye/side seam stitching line. Draw the new hemline and then draw the gently curved princess seamline to connect the original piece to the new hemline. The curve should extend about 1/4" when it reaches the hemline.Draw the center back seam line and trace all the other sedges of the piece. Draw the stitching lines and your pieces is ready to use.
    • To create the modified Back Lining piece, simply line up and trace the side seam of the Side Back with the existing Back Lining piece. Line up the armscyes and extend the piece to the new hemline on both the side seam and the center back edge.
    • Add a notch marking to the Side Back piece along the side seam for the belt placement.

    Here's a breakdown of the revised sewing instructions:

    • Follow the instructions for steps 1-5 to sew the Back and Side Back pieces. For this version the pieces will be full length. Note - I was using a thicker wool fabric for this project, so I pressed my seams open instead of to one side to reduce the bulk.
    • Skip steps 6-13.
    • Continue sewing steps 14-42, noting that the Back Lining is full length for this design.
    • Continue sewing through step 48. At this step, you will sew the full side seam of the ling on one side and on the opposite side, leave a 2" gap in the side seam open so you can turn the coat right side out. Sew about an inch up from the bottom hemline and an inch down from the top of the side seam/underarm.
    • Continue sewing to Step 50. Pin the entire perimeter edge of the coat, around the entire hemline. Stitch all the way around.
    • Skip steps 53-54. Whipstitch the small opening at the side seam.
    • Continue following the instructions to finish the coat!

    Congratulations! Your Classic Peacoat is finished! 

    We'd love to see your finished coats! Be sure to share them in the SWC Facebook group for all to see!


    Wondering Where I got my fabric? It's from Mood!


    Windsor Wine Marbled Boiled Wool. I love how this coat turned out! With a bit of extreme pressing and the handy pliers trick, the coat turned out perfectly!


    I bought a 1/2 yard piece and I used just about half of it. My lining was purchased a while back at JoAnn Fabrics.

    Interested in making your own clothing labels? Here's a video I made years back showing how I made mine with iron on paper and narrow ribbon. 

    Option 2: You could also do something similar with printed fabric and a product like Heat n Bond. No need for the ribbon, just apply the fusible web to the printed fabric and then cut them out and iron them on to your garment. Stitch around the edges for a long lasting label.

    Reminder: If you're looking to download any of these videos, click on over to the the SWC Bonuses page to get the link and password for this months topic collection on Vimeo.

    ]]>
    https://larougetdelisle.com/blogs/sewing-with-cinnamon/sewing-a-themed-wardrobe-the-zip-front-rash-guard-pattern-hack 2020-05-19T08:30:00-07:00 2023-09-02T18:11:56-07:00 Sewing A Themed Wardrobe: The Zip-Front Rash Guard Pattern Hack Cinnamon Miles Hi Everyone! Welcome to Part 3 of Sewing A Themed Wardrobe. In this tutorial, we create a fresh new look for the Rash Guard Top, a classic Malibu Libby design! We've flipped things around this time and have modified this into a zip-front rash guard top. The tutorial added as a printable PDF so it's easy to follow along. I invite you to grab your pattern, print the pdf, and follow along to see how we did it!

    More

    ]]>

    Hi Everyone! Welcome to Part 3 of Sewing A Themed Wardrobe. In this tutorial, we create a fresh new look for the Liberty Jane Rash Guard Top, a classic Malibu Libby design! We've flipped things around this time and have modified this into a zip-front rash guard top. The tutorial added as a printable PDF so it's easy to follow along. I invite you to grab your pattern, print the pdf, and follow along to see how we did it!

    Are you ready? Let's go...

    First, let's take a look at our inspiration:

    This is inspired by the new AG GOTY doll, her swim outfit is pictured on the far left. The other two looks are on-trend surf styles from brands like Roxy®. The main elements are:

    • Zip front design
    • Contrasting fabrics blocked to create impact
    • One-piece or just a top
    • Swim shorts and flip flops complete the look!


    Ok, follow along to see how we created our look...

    Part 3 Tutorial - The Zip-Front Rash Guard Pattern Hack:

    Week Two Task:

    • Print out the Zip-Front Rash Guard Pattern Hack instruction PDF from the SWC Bonuses Section.
    • Grab your Rash Guard pattern and get ready to sew (this has been free multiple times, so many of you should have it in your stash)!
    • Select the fabrics you'd like to make this look. Swim knits are essential. Look for solids or prints that have a nice contrast. There are a few websites mentioned in the Ultimate Resource Guide if you are looking for places to shop.
    • Jump over the SWC Facebook Group for conversation and project sharing.

    Here are a few additional video resources that might help you with this project. Shortening a separating zipper, and sewing with swim fabrics.


    Patterns used in this weeks video example:

    The Liberty Jane Rash Guard pattern for 18" dolls.


    Next Tuesday - Part 4: It's all about swimsuits and accessories!

      ]]>
      https://larougetdelisle.com/blogs/sewing-with-cinnamon/sewing-a-themed-wardrobe-the-ca-cami-cover-up-pattern-hack 2020-05-12T08:30:00-07:00 2023-09-02T18:11:59-07:00 Sewing A Themed Wardrobe: The CA Cami Cover Up Pattern Hack Cinnamon Miles Hi Everyone! Welcome to Part 2 of Sewing A Themed Wardrobe. In this tutorial, we create a fresh new look for the CA Cami, one of our very first Malibu Libby designs! We've given it a light and airy feel with a touch of the beachy breezy vibe by using a semi-sheer white fabric accented with lace and casually tied straps. The tutorial is super easy to follow and can be made using a variety of fabrics. I invite you to follow along as I show you how we did it!

      More

      ]]>

      Hi Everyone! Welcome to Part 2 of Sewing A Themed Wardrobe. In this tutorial, we create a fresh new look for the CA Cami, one of our very first Malibu Libby designs! We've given it a light and airy feel with a touch of the beachy breezy vibe by using a semi-sheer white fabric accented with lace and casually tied straps. The tutorial is super easy to follow and can be made using a variety of fabrics. I invite you to follow along as I show you how we did it!

      Are you ready? Let's go...

      First, let's take a look at our inspiration:

      This is a gathered collection of images of the "vibe" we are going for. The main elements are:

      • All White
      • Airy, flowing fabric choice
      • Loose-fitting, comfortable for easy layering
      • Lace trims, ties, and gathers
      • Straw hat or bag accents complete the look!


      Ok, follow along to see how we created our look...

      Part 2 Tutorial - The CA Cami Cover-Up:

      Week Two Task:

      • Watch the videos and follow along to see how we created this darling look. (Please note that in the video I mention that the skirt width is 12 inches, it's actually 24 inches because it is cut on a fold.) 
      • Grab your CA Cami pattern and get ready to sew!
      • Select the fabrics you'd like to make this look. Lightweight woven fabrics such as batiste, lawn, rayon, and voile all work well for this type cover-up.
      • Pattern Prep - To remove the bodice side seam, overlap the front and back bodice pieces lining up the dashed stitch line. Tape them together to create one pattern piece. Place the Bodice Front on the fold and cut out the bodice all as one piece.
      • Use the width of the Long Strap pattern piece as your guide and cut two 10 inch x 1.25 inch pieces and one 42 inch x 1.25 inch strips.
      • For the skirt - Cut One 24 inch x 3 inch piece for the top tier. Cut two 24 inch x 2 inch pieces for the second and third tiers.
      • Cut two strips of 1/4 inch width lace 24 inches long.
      • Cut one lace or trim for the hemline 24 inches long.
      • Hem the Bodice front and back top edges, add lace peeking out if desired.
      • Beginning at the center of the bodice underarm, line of the center of the strap piece with right sides together and sew it to the armscye.
      • Fold the strap piece in half lengthwise, turning the raw edge in towards the center and topstitch the entire strap. Try it on the doll and cut to the proper length after tieing the ends.
      • Sew the three tiers of the skirt together by piecing the lace in between each section.
      • Follow the instructions in the pattern to finish up the top/dress. When you get to the part to finish the back opening, don't add the hook and loop tape. Simply hem the Center back edges and then place the long tie over the emprie waist seam line. Topstitch it in place and use the len ties to criss-cross at the back and wrap around to tie in the front.
      • Jump over the SWC Facebook Group for conversation and project sharing.


      Patterns used in this weeks video example:

      The Liberty Jane CA Cami pattern for 18" dolls. It's available as part of a bundle with the Mini Skirt as well as on it's own.  It's also available in several other sizes, KNC, BFC Ink, and Karito Kids.


      Resources:

      Cotton Lace - This shop has a great selection of 1/4" width lace! I see them at quilt shows all around the country, but you can order from them directly online too! 

      https://larougetdelisle.com/


      Next Tuesday - Part 3: The rashguard top gets an all-new look with a re-designed zipped front.

        ]]>
        https://larougetdelisle.com/blogs/sewing-with-cinnamon/sewing-a-themed-wardrobe-topic-overview-and-the-beach-scene-outfit-tutorial 2020-05-05T08:30:00-07:00 2023-09-02T18:12:00-07:00 Sewing A Themed Wardrobe: Topic Overview and the Beach Scene Outfit Tutorial Cinnamon Miles Hi Everyone! Welcome to the topic of Sewing A Themed Wardrobe! I'm super excited to introduce this as a new series, one that we'll revisit a few times during the year with a new emphasis each time! For this month's topic, the theme is "So-Cal Lifestyle Scene". Early on, when we first launched Liberty Jane...

        More

        ]]>

        Hi Everyone! Welcome to the topic of Sewing A Themed Wardrobe! I'm super excited to introduce this as a new series, one that we'll revisit a few times during the year with a new emphasis each time! For this month's topic, the theme is "So-Cal Lifestyle Scene". Early on, when we first launched Liberty Jane we introduced four themed collections: Tokyo Libby, Outback Libby, Euro Libby, and Malibu Libby. With the recent release of the American Girl® 2020 Girl Of The Year doll Joss Kendrick™, it seemed like the perfect time to revisit and refresh our Malibu Libby collection!

        The Sewing A Themed Wardrobe Topic Will Include:

        • Part 1 - Topic Overview, Beach Scene Outfit Tutorial, Screen Printing
        • Part 2 - The CA Cami makeover - Now an on-trend coverup!
        • Part 3 - The zip-front rashguard and other swim looks
        • Part 4 - So-Cal Beach Accessories!

        Are you ready? Let's go...


        Patterns used in this weeks video examples:

        Liberty Jane Baseball Tee also available in several other sizes, Wellies, Hearts For Hearts Girls, KNC, BFC Ink, and Ellowyne.


        Liberty Jane Drawstring Shorts were used to make the pants.


        Week One task:

        • Watch the videos and follow along to see how we created this darling look.
        • Grab your patterns and get ready to sew!
        • Select the fabrics you'd like to make these looks. Lightweight knits are great for the tank and a lightweight woven works great for this type of pants.
        • If you want to add the screen print, see the link below for the resource list. If you want to use a short cut, upcycle an old tee that has a small screenprint positioned on the left front chest area. Cut the Shirt front so the graphic is positioned at the center front. Viola! You have a super cute mini graphic tee!
        • Jump over the SWC Facebook Group for conversation and project sharing.

        Part 1 Tutorial - The Beach Vibes Look:


        Resources:

        Chalk Couture Website (not an affiliate, I just like this product and am happy to recommend it!)

        "Love" Transfer Sheet

        Screen Print Inks

        Small Squeegee

        Pink knit fabric was found at Jo-Ann Fabrics

        The stripe rayon print was a girls jumpsuit we found on clearance at Fred Meyer!


        Here are a few examples of the "shortcut" graphic tees :)

        Next Tuesday - Part 2: The CA Cami makeover - Now an on-trend coverup!

          ]]>
          https://larougetdelisle.com/blogs/sewing-with-cinnamon/sewing-the-silk-road-dress-the-snowman-pattern-hack 2019-12-17T08:00:00-08:00 2023-09-02T18:12:38-07:00 Sewing The Silk Road Dress - The Snowman Pattern Hack Cinnamon Miles Hello Everyone! The very snowy start we've had to our holiday season here in Minnesota was the inspiration for this week's design hack for The Silk Road dress pattern. Using reverse appliqué, we are going to create two snowman sections that will build on each other with each wrap of the dress.

          More

          ]]>

          Hello Everyone! The very snowy start we've had to our holiday season here in Minnesota was the inspiration for this week's design hack for The Silk Road dress pattern. Using reverse appliqué, we are going to create two snowman sections that will build on each other with each wrap of the dress.

          Reverse appliqué is a needlework technique in which two or more layers of cloth are sewn together with decorative outlines and the cloth is then cut from the outlines to reveal a specific layer of cloth underneath. The cut edges can be turned under for a more finished look, but to give the snowman in our project a softer outline, the cut edges of the applique are left raw and frayed. For the perfect finish, the dress trim is omitted and two of the ties are replaced with scarf ends so that the snowman is not only decorative, but also a functional part of the dress. Use the templates I've provided and watch the video below to learn how to make this fun and easy snowman dress - just in time to celebrate Christmas!


          To get started, you'll need to download the Thimbles and Acorns Silk Road pattern. Look over the pattern, review the supply list and gather up all the necessary fabrics and supplies.


          To make the Wrap a Snoman variation, you need a few additional supplies. Please download the free supplemental PDF to get the full tutorial and additional template pieces for the applique. Other than that, the supplies are the same.

            Tutorial Download:

            Grab the full PDF download in the Sewing With Cinnamon Bonus section, here: Wrap A Snowman Pattern Hack


             Week Three Task:

            • Watch the Sew-Along Pattern Hack video and follow along with your project.
            • Check out the Ultimate Resource Guide for fabric and supply sources. (Find this in the SWC Bonuses section)
            • Jump over the SWC Facebook Group for conversation and project sharing. Show us what you're working on and post your questions in the facebook group under the announcement video for this month. Be sure to tag Shari, so she sees your questions and can respond quickly!


            ]]>
            https://larougetdelisle.com/blogs/sewing-with-cinnamon/sewing-the-silk-road-dress-liberty-jane-pattern-hack 2019-12-10T08:00:00-08:00 2023-09-02T18:12:39-07:00 Sewing The Silk Road Dress - Liberty Jane Pattern Hack! Cinnamon Miles Hi Everyone! This week I'm jumping in to share a super cute pattern hack of the Silk Road Dress design! After a bit of experimentation and creative thinking, I've settled on a darling little top made by tweaking a few pieces and modifying the construction just ever so slightly!

            More

            ]]>

            Hi Everyone! This week I'm jumping in to share a super cute pattern hack of the Silk Road Dress design! After a bit of experimentation and creative thinking, I've settled on a darling little top made by tweaking a few pieces and modifying the construction just ever so slightly!

            The original design included several great elements that I wanted to keep when modifying it into a top. The wrap & tie front, of course! But I also wanted to keep the cross over back neckline, while removing the double wrap element. Watch the video below to follow my process and see how I modified the pieces to create this cute little top!


            To get started, you'll need to download the Thimbles and Acorns Silk Road pattern. Look over the pattern, review the supply list and gather up all the necessary fabrics and supplies.


            To make the top, you need just a 1/4 yard of fabric. Other than that, the supplies are the same.

               Tutorial Highlights:

              • Start - 4:15 Overview and pattern piece modification.
              • 4:15 - 5:10 Cut pieces and construction
              • 5:10 - 7:50 Instruction modification for the Neckline/Back
              • 7:50 - 9:20 Back Construction, side seams
              • 9:20 - End Finishing the top

              The main changes to this pattern are the modification to remove the "double wrap" which alters the construction method a bit. 

              When following the pattern instructions, you'll want to stop at Step 5 and sew the lining to the fabric along the neckline as shown in the hack video.

              Instead of tacking the ties down where marked on the original pattern, they will be placed in the underarm side seams 1/2" down from the raw edge (one in the lining on wearer's left and one in the fabric on wearer's right). The two ties in the front are the same.

              Sew the side seams after you have overlapped the back as shown in the hack video!

              You can continue to add trim or simply finish the top without trim - the choice is yours!


               Week Two Task:

              • Watch the Sew-Along Pattern Hack video and follow along with your project.
              • Show us what you're working on and post your questions in the facebook group under the announcement video for this month. Be sure to tag Shari, so she sees your questions and can respond quickly!
              • Check out the Ultimate Resource Guide for fabric and supply sources. (Find this in the SWC Bonuses section)
              • Jump over the SWC Facebook Group for conversation and project sharing.


              ]]>
              https://larougetdelisle.com/blogs/sewing-with-cinnamon/sewing-swimsuits-the-summer-tote-pattern-hack 2019-06-25T17:30:00-07:00 2023-09-02T18:13:11-07:00 Sewing Swimsuits - The Summer Tote Pattern Hack Cinnamon Miles Hi Everyone! In Part 4, we wrap up the topic with a look at ways to complete the summertime look with the perfect accessories! There are a variety of things you can pair with your swimsuit to create a super cute ensemble set - A cover-up, sandals or slip-ons, shorts, and, of course, the perfect tiny tote!

              More

              ]]>

              Hi Everyone! In Part 4, we wrap up the topic with a look at ways to complete the summertime look with the perfect accessories! There are a variety of things you can pair with your swimsuit to create a super cute ensemble set - A cover-up, sandals or slip-ons, a floppy sun hat, shorts, and, of course, the perfect tiny tote!

                One of the trends I've seen popping up all over the place is the circular straw totes and purses - they're everywhere! I've seen them made with both straw or rope. 

                Many are done in a natural color but I've also seen some really cute colored styles, all one color or a swirl of combined colors - there are so many design ideas for this project! There are also a variety of sizes - large beach totes with short handles or tiny handbags with longer shoulder straps - really the possibilities are endless!

                I immediately went to work to figure out how to make one scaled down in miniature and am excited to share this super easy pattern hack with you! It's a simple version creating a larger bag similar to a beach or market tote. The handles are short and made using the rope cording. 

                Follow along in the video posted below to see how to make this darling little tote! Are you ready? Let's go...


                Watch The Straw Tote Pattern Hack video below:

                This pattern hack is done using the LJ Halloween Treat Bag Pattern pattern pieces and a few simple modifications to the design.

                • Instead of using felt to construct the body of the bag, I've used a twisted rope cording and a circular sewing technique to create a look that mimics a woven straw tote! I recommend 1/4" width (or narrower) cording and a lightweight stabilizer (tissue paper or a coffee filter work perfectly!)
                • For the sides of the bag, I used 2" width Crocheted Cluny Trim, cut to the size of the Side Bag pattern piece.
                • The assembly of the bag is the same as the original pattern - a hand-sewn blanket stitch, sewn with embroidery floss, that connects the side to the front and back.
                • The only change in the bag design is that the strap itself is combined into the front and back pieces by leaving a 6-inch extension of the rope cording to create the handle.

                Don't worry if this doesn't make sense as you read it! All of it is shown in the video below :)


                Patterns Used For this Topic: 

                • LJ Free Swimsuit
                • LJ Rashguard & Swim Shorts
                • 123 Mulberry Street Gotchies (will be used for the part 2 sew-along demonstration) 18" size is being updated and 14.5" size will be published prior to the sew along.
                • Patterns found in the larougetdelisle Swim Shop Collection
                • LJ Halloween Treat Bag (hmmm, maybe I should change the title to "The Cutest Tiny Handbag Ever!")

                Week Four Task:

                • Watch the tutorial video, follow along, and try it out! You could do this circular sewing technique with any type of cording - colored bags would be super cute!
                • Check out the Ultimate Resource Guide for fabric and supply sources. (Find this in the SWC Bonuses section)
                • Jump over the SWC Facebook Group for conversation and project sharing.


                If you'd like a bit more instruction on how to sew the original treat bag design, and a closer look at sewing a blanket stitch, watch this video below (start at 1:28):


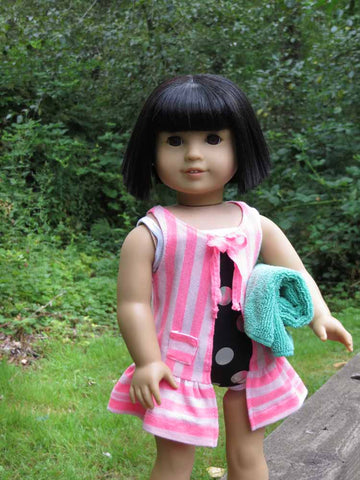
                Looking for a super cute swimsuit cover-up?

                Follow along in the free tutorial to see how we made this one using this clever pattern hack of the Free Liberty Jane T-Shirt pattern!

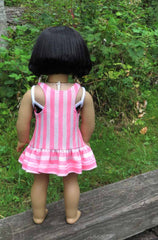
                Today's tutorial is a super cute swimsuit cover-up! It features fun racer-back styling, a single tie at the front, and two tiny pockets. And the best part? All you need is an old t-shirt and the (free!) Liberty Jane Trendy T-Shirt pattern.


                Cut a 2 1/2" wide strip off the bottom of your t-shirt, including the original hem, then cut out the fronts and backs as the pattern directs (you don't need the sleeves). The finished cover-up will open in the front, so for our purposes, we'll pretend the back is the front, and the front is the back. Got it? Let's go!

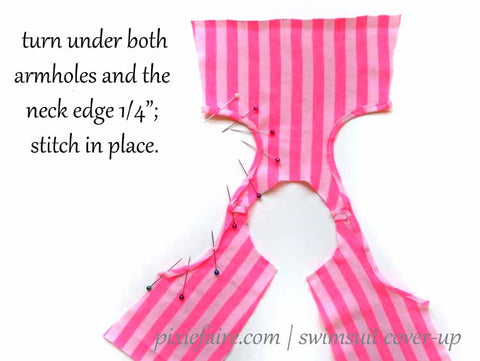
                Next, we'll do some fancy trimming. Open up the shirt, and then refold it along the original front's fold line. Lay the two 'backs' (what will become our fronts) on top of each other, being careful to line everything up. You'll make three sets of cuts; refer to the picture below to see how big and where to make them.

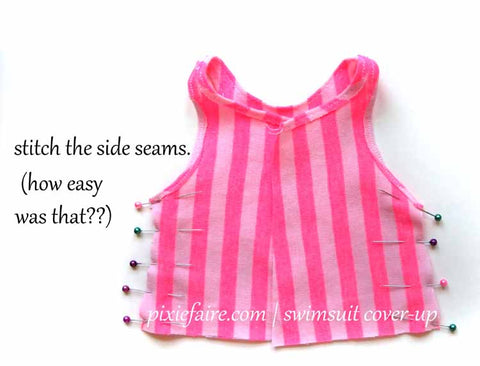
                Then, re-open the top, and hem both armholes and the neckline. Once that's done, sew the side seams!


                Next, take the 2 1/2" strip you cut off the bottom of the shirt. If you used the shirt's hemline, you can save yourself a step, as I did here; otherwise, take a minute and run a narrow hem along one long edge. Cut the strip so that it's 25" long -- or as close to that as you can get with your tee.

                Finally, hem the front edges and add the ties and pockets.

                Then, put it on your doll and let her have a blast!


                ]]>
                https://larougetdelisle.com/blogs/sewing-with-cinnamon/seam-finishes-mindil-beach-dress-sew-along-part-2 2019-04-23T10:00:00-07:00 2023-09-02T18:13:25-07:00 Seam Finishes - Mindil Beach Dress Sew Along Part 2 Cinnamon Miles Hi Everyone! This week we will continue to work our way through the sew-along for the Mindil Beach Dress. We all work at a different pace and have different time allotments dedicated to sewing. This is a time to slow down a bit and work together to finish up this fun project!

                More

                ]]>
                 

                Hi Everyone! 

                  This week we will continue to work our way through the sew-along for the Mindil Beach Dress. We all work at a different pace and have different time allotments dedicated to sewing. This is a time to slow down a bit and work together to finish up this fun project! If you're finished, I'd love to see your dress and hear your thoughts, tips, or trouble spots that may have challenged you. Your feedback will be invaluable to the group and will likely help someone who is still working on their project!

                  I've seen a few finished dresses pop up on Facebook, which has been exciting! If you haven't shared yours yet, please do! If you aren't finished yet - that's perfectly fine! I'd love to see where you're at in the process. Do you have questions? Please ask them.  

                  Do you have ideas for ways to hack this pattern - I'd love to hear them (or see them!) One of my favorite things about sewing and designing is tweaking and modifying designs to create something a little bit different. Could this dress have different sleeves, a higher neckline, a longer skirt length, an alternate back opening finish like buttons and loops? So many things to think about and so many great ideas to create something a little bit different each time! 

                  I'd love to see what you've accomplished!  

                  I'm adding a video this week to show a cute alternative for this dress. The sleeveless variation is a fun and easy hack - perfect for warmer summer days! If you've already sewn up the original design, I'd encourage you to try this alternative as well!


                  Watch the video below to see how to sew the sleeveless variation - Begin watching at 3:25:


                  Still working on sewing the original design? Here are those videos too:


                  Patterns Used For this Topic:

                  Liberty Jane Mindil Beach Dress (for the sew along)

                    Week two task:

                    • Follow along and let's sew the Mindil Beach Dress!
                    • Jump over the SWC Facebook Group for conversation and project sharing.

                    Supplies Needed:

                    • - 1/3 yard fashion fabric
                    • - 9" x 11" piece lining fabric
                    • - Eight 1/4" buttons Like These
                    • - Ten 1/4" (or smaller) eyelets - Like These
                    • - 18" piece of narrow cording or twill tape
                    • - 3.5" piece of 1/8" wide elastic
                    • - iron & pressing board
                    • - Thread
                    • - Hand sewing needle
                    • - Eyelet setting tool such as a Crop-o-dile

                    Suggested Fabrics: Lightweight woven cotton, rayon challis, shirting cotton, lawn, and silky poly/ blends.

                    Added Bonus: This dress is perfect for using the Button Sew ON Foot, so I've also included a few other SWC videos that show how to use this to sew the buttons on the dress front by machine :)


                    Next week we will look at a sewing a french seam and how to incorporate that into an existing pattern design.

                    ]]>
                    https://larougetdelisle.com/blogs/sewing-with-cinnamon/seam-finishes-mindil-beach-dress-sew-along 2019-04-16T10:00:00-07:00 2023-09-02T18:13:28-07:00 Seam Finishes - Mindil Beach Dress Sew Along Cinnamon Miles Hi Everyone! Are you ready to sew the Mindil Beach Dress? This week I have a set of step by step sew along videos that will walk you through the entire assembly of the dress. We will follow the pattern instructions with the addition of the hong kong binding technique!

                    More

                    ]]>
                     

                    Hi Everyone! 

                      Are you ready to sew the Mindil Beach Dress? This week I have a set of step by step sew along videos that will walk you through the entire assembly of the dress. We will follow the pattern instructions with the addition of the hong kong binding technique!


                      Watch the overview video for this months topic:


                      Patterns Used For this Topic:

                      Liberty Jane Mindil Beach Dress (for the sew along)

                        Week two task:

                        • Follow along and let's sew the Mindil Beach Dress!
                        • Jump over the SWC Facebook Group for conversation and project sharing.

                        Supplies Needed:

                        • - 1/3 yard fashion fabric
                        • - 9" x 11" piece lining fabric
                        • - Eight 1/4" buttons Like These
                        • - Ten 1/4" (or smaller) eyelets - Like These
                        • - 18" piece of narrow cording or twill tape
                        • - 3.5" piece of 1/8" wide elastic
                        • - iron & pressing board
                        • - Thread
                        • - Hand sewing needle
                        • - Eyelet setting tool such as a Crop-o-dile

                        Suggested Fabrics: Lightweight woven cotton, rayon challis, shirting cotton, lawn, and silky poly/ blends.

                        Added Bonus: This dress is perfect for using the Button Sew ON Foot, so I've also included a few other SWC videos that show how to use this to sew the buttons on the dress front by machine :)


                        Next week we will look at a few other variations that we can do with this pattern too!

                        ]]>
                        https://larougetdelisle.com/blogs/sewing-with-cinnamon/sewing-modified-pattern-hacks-3-sleeve-modifications 2019-03-26T10:00:00-07:00 2023-09-02T18:13:31-07:00 Sewing Modified Pattern Hacks - 3 Sleeve Modifications Cinnamon Miles Hi Everyone! In part 4 we are taking a look at how to switch things up a bit and modify a sleeve into a new design style. This is easy to do once you become familiar with the process - so let's jump right into this weeks tutorial! 

                        More

                        ]]>

                        Hi Everyone! In part 4 we are taking a look at how to switch things up a bit and modify a sleeve into a new design style. This is easy to do once you become familiar with the process - so let's jump right into this weeks tutorial! 

                        At the beginning of this course topic, I asked you to submit some ideas for potential hacks. This time I've selected a few that were suggested by Jennifer Ackerman - Thanks, Jen! She posted a bunch of sleeve styles and I thought it would be fun to select a few and show you my process for doing some simple tweaks to existing patterns to get a similar look. As a reminder, this is simple pattern hacking, so we are using existing patterns to create the inspiration looks. These will be close to the desired result, but maybe not exact replicas. If you want to learn the art of pattern drafting from the beginning point, the Pattern Academy course is something that you'll want to look into :)

                        For this week's tutorial, I'll be demonstrating three sleeve style hacks. I'm using the Killara Dress and the Cortina Top patterns as my starting point. This type of idea can be done from any pattern piece that you might already have, just pay attention to the design lines and shape of the pice that you choose to start with. Follow along with me in the video below to see how I made the changes to the pieces and created something similar to the inspiration image.


                        Patterns Used For this Topic (this week):

                        Liberty Killara Dress (Lightning Ridge Top)

                        Liberty Cortina Top 


                        Week Four Task:

                        • Watch the videos. Follow along as I show you how to dive right in and modify your existing pattern pieces! Try it out yourself!
                        • I'd love to see your pattern hacks if you've done some or try one out for this new topic!
                        • Jump over the SWC Facebook Group for conversation and project sharing.


                        ]]>
                        https://larougetdelisle.com/blogs/sewing-with-cinnamon/sewing-modified-pattern-hacks-modifying-pattern-pieces 2019-03-19T10:00:00-07:00 2023-09-02T18:13:32-07:00 Sewing Modified Pattern Hacks - Modifying Pattern Pieces Cinnamon Miles Hi Everyone! In part 3 we go a bit deeper into pattern hacking with a look at how to modify pattern pieces. Sometimes a few simple changes can really change up the look of a design!

                        More

                        ]]>
                         

                        Hi Everyone! In part 3 we go a bit deeper into pattern hacking with a look at how to modify pattern pieces. Sometimes a few simple changes can really change up the look of a design!

                        At the beginning of this course topic, I asked you to submit some ideas for potential hacks. Thanks for all your participation! There are so many great ideas! When I saw this adorable dress posted by Pat, I knew right away it would fit right into this series! The dress has simple lines and a beautiful hi-lo design focal point. With a few tweaks and modifications to the Starlight Gala pattern, I knew I could achieve a similar look. 

                        For this week's tutorial, I'll be demonstrating on a new dress made with a modified skirt from the Starlight Gala pattern and a simple modification to the bodice front. Follow along with me in the video below to see how I made the changes to the pieces and created something similar to the inspiration image.


                        Video Timeline:

                        • Beginning - 2:00 Overview
                        • 2:00 - 6:00 Modifying the Original Hi-lo skirt into a knee length skirt.
                        • 6:00 - 12:40 Creating the Hi-lo layer that lays from side to side.
                        • 12:40 - 14:45 Finishing details for the skirt layers.
                        • 14:45 - 17:36 Bodice modifications


                        Tutorial Highlights:

                        Cut pieces for the modified design. Solid blue pieces are for the Main Skirt and the Bodice Lining. Floral print pieces are for the Bodice, and Skirt Overlay.

                        Skirt layers constructed and Bodice ready to attach to the skirt. Notice the hi-lo design is going from the side to the opposite side, mirrored on the front and back, the center back opening is at the top of the photo.

                        Finished Dress!


                        Patterns Used For this Topic (this week):

                        Liberty Starlight Gala

                        Liberty Blossom


                        Week One task:

                        • Watch the videos. Follow along as I show you how to dive right in and modify your existing pattern pieces! Try it out yourself!
                        • I'd love to see your pattern hacks if you've done some or try one out for this new topic!
                        • Jump over the SWC Facebook Group for conversation and project sharing.

                        Designer Note: There are many ways to achieve a look like this, the skirt design could be done with a gathered waistline as well. You could also choose to cut the first layer as a circle skirt with a flat waistline seamline and then the top layer with a fuller gathered or pleated waistline. The choice is yours! I encourage you to experiment with different design ideas to see what version you like best!

                        Next Tuesday - Part 3: Another pattern hacking tutorial!


                        ]]>
                        https://larougetdelisle.com/blogs/sewing-with-cinnamon/sewing-modified-pattern-hacks-starlight-gala-blossom-mash-up 2019-03-12T10:00:00-07:00 2023-09-02T18:13:35-07:00 Sewing Modified Pattern Hacks - Starlight Gala Blossom Mash-Up Cinnamon Miles Hi Everyone! In part 2 we jump right in and do a mash-up of two of my favorite patterns - Starlight Gala and Blossom! Because these patterns have been drafted using the same set of standardized Liberty jane slopers, they have the ability to interchange the pieces. The determining factor in this design is the waistline of the two garments. Both bodices have the same waistline measurement, so they can easily be swapped to create a variety of unique looks!

                        More

                        ]]>
                         

                        Hi Everyone! In part 2 we jump right in and do a mash-up of two of my favorite patterns - Starlight Gala and Blossom! Because these patterns have been drafted using the same set of standardized Liberty jane slopers, they have the ability to interchange the pieces. The determining factor in this design is the waistline of the two garments. Both bodices have the same waistline measurement, so they can easily be swapped to create a variety of unique looks!

                        For this week's tutorial, I'll be demonstrating on a new dress made from the Starlight Gala skirt and the Blossom bodice (simplified version with the underlay moved to be an overlay).

                        Designer Note: I mentioned this in the video towards the end, but wanted to preface it here before you might cut out any of the pieces. The Blossom dress bodice sits a bit higher at the waistline resulting in the dress being about 1/4 -1/2 inch shorter. The original design is pretty short in the front, so you might want to add a bit of length to the Blossom bodice pieces before you cut them out. To do this, simply extend the pieces by adding an additional 1/4-inch "seam allowance" along the waistline edge. Be sure to do this along the waistline edge of all 4 pieces - The Underlay Front and Back and the Simplified Bodice Front and Bodice Back).


                        Follow along with me in the video below!


                        Patterns Used For this Topic (this week):

                        Liberty Starlight Gala

                        Liberty Blossom


                        Week One task:

                        • Watch the videos. Follow along as I show you how easy it is to combine these two designs into a beautiful new look! Try it out yourself!
                        • I'd love to see your pattern hacks if you've done some or try one out for this new topic!
                        • Jump over the SWC Facebook Group for conversation and project sharing.

                        Next Tuesday - Part 3: I'll show you some design ideas based on your Pattern hacking suggestion posted in the Facebook group.


                        Interested in more pattern hacks? We have a whole blog dedicated to them on larougetdelisle. Here are a few links to some of my favorite:

                        ]]>
                        https://larougetdelisle.com/blogs/sewing-with-cinnamon/sewing-modified-pattern-hacks-topic-overview 2019-03-05T10:00:00-08:00 2020-09-25T09:49:16-07:00 Sewing Modified Pattern Hacks - Topic Overview Cinnamon Miles Hi Everyone! Let's talk about - Creating unique looks with pattern hacks! Throughout this 4 part topic, we will cover a variety was to hack your patterns! There are so many ways to mix things up and create unique designs. You can combine pieces from different patterns, I call this one a "mash-up", or tweak an existing piece to add a new design element (this is a traditional hack), or lengthen part of the design (a simple hack), and so much more! I'm really excited about this opportunity to go deep into this topic!

                        More

                        ]]>
                         

                        Hi Everyone! Let's talk about - Creating unique looks with pattern hacks! 

                        Throughout this 4 part topic, we will cover a variety was to hack your patterns! There are so many ways to mix things up and create unique designs. You can combine pieces from different patterns, I call this one a "mash-up", or tweak an existing piece to add a new design element (this is a traditional hack), or lengthen part of the design (a simple hack), and so much more! I'm really excited about this opportunity to go deep into this topic!

                        I'll be demonstrating these methods while sewing a variety of Liberty Jane designs to help illustrate how the basic techniques and methods are used. Follow along to understand my thought process, it may seem unconventional, but that's what makes it fun! 

                        There are so many things you can do once you take the fear out of "pattern hacking". It's going to be a fun course!

                        Are you ready? Let's go...


                        Watch the overview video for this months topic:


                        Then, Jump over to the SWC Facebook group to give me some design plan challenges!

                        Here's a video that was also part of the Sewing Specialty Fabrics course, in this one I show a bit of the process for creating matching dance costumes for my daughter. This is how it all started for me. Once people saw these scaled down miniature versions of the designs I was being asked all the time to recreate things as custom orders. I love to do this, I am constantly flipping garments inside out at the store or collecting images of new fashions to scale down and recreate.


                        Patterns Used For this Topic (this week):

                        Liberty Jane T-shirt

                        Liberty Jane Swimsuit

                        Next week: Starlight Gala & Blossom


                        Week One task:

                        • Watch the videos. Follow along as I explain my process for creating matching garments or scaled down "Fashion in Miniature".
                        • Collect your own wishlist of design ideas. Share one with me in the Facebook group under the Design Challenge Post. I'll be selecting a few to create design plans for using the pattern hack method.
                        • I'd love to see your pattern hacks if you've done some or try one out for this new topic!
                        • Jump over the SWC Facebook Group for conversation and project sharing.

                        Next Tuesday - Part 2: We'll do some pattern hacking with the Blossom Dress and Starlight Gala Dress patterns.


                        Interested in more pattern hacks? We have a whole blog dedicated to them on larougetdelisle. Here are a few links to some of my favorite:

                        ]]>
                        https://larougetdelisle.com/blogs/sewing-with-cinnamon/sewing-with-pleats-finishing-techniques 2019-02-26T10:00:00-08:00 2023-09-02T18:13:36-07:00 Sewing With Pleats - Finishing Techniques Cinnamon Miles Hi Everyone! This week we're going a bit deeper with last weeks project. With so many cut pieces the issue of how to best finish those interior seam allowances arrises. I have a few quick fixes I'm excited to share!

                        More

                        ]]>
                         

                        Hi Everyone! This week we're going a bit deeper with last weeks project. With so many cut pieces the issue of how to best finish those interior seam allowances arrises. I have a few quick fixes I'm excited to share!

                        For this example, we are going to cut the strips vertical along the grain of the fabric, hot horizontial as demostrated in the prior tutorial. This will allow us to finishe the seam allowances all at once, prior to cuting the small rectangular pieces apart. In the video, I demonstrate two techniques - one by machine and the other with a anti-fray product applied. For the example project in the video, I am using the skirt portion of the Cosplay Day Dress pattern (from the prior tutorial).


                        Week Four Task:

                        • I encourage you to try one of these techniques and post an example of your pleating work in the Facebook group. I've really enjoyed seeing the participation during the topic! If you have other pleating tips, please share them with the group!
                        • Jump over the SWC Facebook Group for conversation and project sharing. 


                        Patterns Used For this Topic:

                        Liberty Jane Pleated Skirt 18" Dolls

                        Liberty Jane Pleated Skirt 14-14.5" Dolls

                        Liberty Jane Piccadilly Peacoat 18" Dolls

                        Liberty Jane Piccadilly Peacoat 14-14.5" Dolls

                        Liberty Jane Piccadilly Peacoat 16" Ellowyne Wilde Dolls

                        Liberty Jane Piccadilly Peacoat 18" BFC, Inc. Dolls

                        Liberty Jane Harper Skirt 18" Dolls

                        Liberty Jane Steam Skirt 18" Dolls

                        Liberty Jane Steam Skirt 18" BFC, Ink. Dolls

                        Liberty Jane Steam Skirt 16" Ellowyne Wilde Dolls

                        Liberty Jane Cosplay Day Dress 18" Dolls

                        ]]>
                        https://larougetdelisle.com/blogs/sewing-with-cinnamon/sewing-with-pleats-adding-contrast-with-inverted-pleats 2019-02-19T10:00:00-08:00 2023-09-02T18:13:38-07:00 Sewing With Pleats - Adding Contrast With Inverted Pleats Cinnamon Miles Hi Everyone! This week we take a look at using the methods we've been practicing and adapting them to the inverted pleat design element. The tutorial instruction shows how to use contrasting fabrics to add design interest - follow along and let's practice sewing inverted pleats!

                        More

                        ]]>
                         

                        Hi Everyone! This week we take a look at using the methods we've been practicing and adapting them to the inverted pleat design element. 

                        An inverted pleat is a pleat formed by bringing two folded edges toward or to a center point on the outside of the material to form a box pleat on the inside. The design features a repeating inverted pleat element along the entire skirt.

                        You can use the machine method (with the tape marking and the pin folding) to make these pleats, you just need to remember that each pleat will fold in the opposite direction - one under - one over, repeating.

                        In the video, I demonstrate how to splice apart a pleated design to add contrasting interest. For the example project in the video, I am using the skirt portion of the Cosplay Day Dress pattern. I've simply sewn the waistband pieces together along the top seamline to create a standalone skirt. Note - The design of the pattern has a dropped waist, so the finished skirt sits at the hips (not the waist.) I show two examples - the first uses just one accent fabric insertion, the second uses a contrasting fabric for the entire series of pleats.


                        Patterns Used For this Topic:

                        Liberty Jane Pleated Skirt 18" Dolls

                        Liberty Jane Pleated Skirt 14-14.5" Dolls

                        Liberty Jane Piccadilly Peacoat 18" Dolls

                        Liberty Jane Piccadilly Peacoat 14-14.5" Dolls

                        Liberty Jane Piccadilly Peacoat 16" Ellowyne Wilde Dolls

                        Liberty Jane Piccadilly Peacoat 18" BFC, Inc. Dolls

                        Liberty Jane Harper Skirt 18" Dolls

                        Liberty Jane Steam Skirt 18" Dolls

                        Liberty Jane Steam Skirt 18" BFC, Ink. Dolls

                        Liberty Jane Steam Skirt 16" Ellowyne Wilde Dolls

                        Liberty Jane Cosplay Day Dress 18" Dolls

                        ]]>
                        https://larougetdelisle.com/blogs/sewing-with-cinnamon/sewing-with-socks-the-cropped-cardigan-tutorial 2018-12-11T10:00:00-08:00 2023-12-10T13:55:51-08:00 Sewing With Socks - The Cropped Cardigan Tutorial Cinnamon Miles Hi Everyone! Are you ready to tackle another fun project using socks? This one works great with socks that have a print design that can be worn in any direction - things like stars, stripes, dots, etc.

                        More

                        ]]>
                         

                        Hi Everyone! Are you ready to tackle another fun project using socks? This one works great with socks that have a print design that can be worn in any direction - things like stars, stripes, dots, etc. For this tutorial I'm using the top of the sock ribbing as the waistline of the sweater, so the sock will be flipped upside down to create the cropped cardigan look. We're using the Liberty Jane Cropped Sweater pattern, but flipping it around so it opens at center front. There are two options for the center front opening, use basic binding or go one step further with a separating zipper. The end result is fantastic and super adorable!

                        Are you ready to jump in and tackle this project? Let's go...

                        In the videos posted below, I walk you through the process of making this super cute cropped cardigan. I've covered both the binding and the zipper front opening. You can use them interchangeably.


                        Pattern Overview (designs featured in this weeks video)

                        • Liberty Jane Cropped Sweater For 18" Dolls 
                             

                            Week One task:

                            • Continue to show me your sweaters - It's so fun to see it all come together!
                            • Jump over the SWC Facebook Group for conversation and project sharing.


                            Next Tuesday - Week 3: More Upcycling Secrets!


                            ]]>
                            https://larougetdelisle.com/blogs/sewing-with-cinnamon/sewing-the-denim-jacket-the-fur-lined-pattern-hack 2018-11-27T10:00:00-08:00 2023-09-02T18:13:58-07:00 Sewing The Denim Jacket - The Fur Lined Pattern Hack Cinnamon Miles Hi Everyone! Welcome to Part 4 - For this final installment of Sewing The Denim Jacket we will introduce some pattern drafting skills and add the element of fur to create a "Fur-Lined Denim Jacket"! This style can work great for both boys and girls. The fur lining can be done with a classic faux fur, a soft fleece, or even a vibrant pop of color! The choice is yours, the possibilities are endless!

                            More

                            ]]>
                             

                            Hi Everyone! Welcome to Part 4 - For this final installment of Sewing The Denim Jacket we will introduce some pattern drafting skills and add the element of fur to create a "Fur-Lined Denim Jacket"! This style can work great for both boys and girls. The fur lining can be done with a classic faux fur, a soft fleece, or even a vibrant pop of color! The choice is yours, the possibilities are endless!

                            The tutorial videos are demonstrated on the 18" size pattern. If you want to modify one of the other sizes of the denim jacket, you can use this same technique with any of those sizes too!

                            In the video posted below, I walk you through the modifications to the Front Yoke and Inside Front pattern pieces and then show you the steps to take to add this modification into the existing Denim jacket Pattern Instructions.

                            The modification to this design are:

                            • The Front Yoke and Inside Front will be modified and a third piece (The Front Facing) will be created. This new piece will be cut from the fur.
                            • The Collar piece will be cut 1 denim cut 1 fur.
                            • All other pieces will be cut from the denim fabric as directed.
                            • Sew the Denim Jacket according to the instruction up to Step 23 (using either the faux or flatfelled seam style), then watch the video to see how to attach the facing and finish up the jacket.

                            Note - this style would be super cute made in a corduroy instead of denim!


                            Pattern Overview:

                            • Liberty Jane Denim Jacket For 18" Dolls
                            • Liberty Jane Denim Jacket For 16" AGAT Dolls (Also fits 18" BFC, Ink Dolls)
                            • Liberty Jane Denim Jacket For 14.5" Welliewishers 


                              Resource List:

                              Rivets  - Hobby Lobby

                              Buttons - Home Sew

                              Quilters Tape - 1/8" check in stores locally

                              Wonder Tape - 1/4" Amazon

                              Design Tape - Draping Tape Amazon

                              Edgestitch Foot - Low Shank Amazon

                              1.6mm /80 Twin Needle - Amazon

                              Denim Fabric (I like the 7 oz. weight stretch denim) - Joann Fabrics


                                Week Four task:

                                • It's time for a fashion show! I'd really love to see some Denim Jackets posted in the Facebook group :) Style yours up and show us what you've been working on!
                                • Jump over the SWC Facebook Group for conversation and project sharing.


                                ]]>
                                https://larougetdelisle.com/blogs/sewing-with-cinnamon/sewing-the-denim-jacket-two-hoodie-pattern-hacks 2018-11-20T10:00:00-08:00 2023-09-02T18:13:59-07:00 Sewing The Denim Jacket - Two Hoodie Pattern Hacks Cinnamon Miles Hi Everyone! Welcome to Part 3 -Let's mix things up by adding a few elements of a hoodie to make a cute "Denim Jacket Hoodie"! This style is pretty popular and adds a fun sporty look to the classic style. It's a fun way to mix fabrics and colors to create different looks.

                                More

                                ]]>
                                 

                                Hi Everyone! Welcome to Part 3 -Let's mix things up by adding a few elements of a hoodie to make a cute "Denim Jacket Hoodie"! This style is pretty popular and adds a fun sporty look to the classic style. It's a fun way to mix fabrics and colors to create different looks.

                                The tutorial videos are demonstrated on the 18" size pattern. We've used the hood piece from the LJ Ruched Hoodie pattern.  If you want to modify one of the other sizes of the denim jacket, look for a hoodie pattern in that size to "borrow" the hood piece from. (Or click over the How To Make A Hood Like A Minion Blog Post to see ideas on how to draft your own hood piece.)

                                In the videos posted below, you'll see tow variations of this idea. The first, simply replace the collar with a hood and the sleeves are made with the knit (still cut from the existing pattern piece). The second adds the hood layered on top of the collar and adds an additional ribbed waistband piece along the bottom. Both styles look great. I encourage you to try on or both today!


                                Pattern Overview:

                                • Liberty Jane Denim Jacket For 18" Dolls
                                • Liberty Jane Denim Jacket For 16" AGAT Dolls (Also fits 18" BFC, Ink Dolls)
                                • Liberty Jane Denim Jacket For 14.5" Welliewishers 
                                • Liberty Jane Ruched Hoodie (for the hood piece)


                                  Resource List:

                                  Rivets  - Hobby Lobby

                                  Buttons - Home Sew

                                  Quilters Tape - 1/8" check in stores locally

                                  Wonder Tape - 1/4" Amazon

                                  Design Tape - Draping Tape Amazon

                                  Edgestitch Foot - Low Shank Amazon

                                  1.6mm /80 Twin Needle - Amazon

                                  Denim Fabric (I like the 7 oz. weight stretch denim) - Joann Fabrics


                                    Week Three task:

                                    • I know it's a busy week - but if you're working on sewing projects this would be a fun one to squeeze in! Maybe it could be a gift for someone on your list! 
                                    • Jump over the SWC Facebook Group for conversation and project sharing.


                                    Next Tuesday - Week 3: The Fur Lined Denim Jacket Hack.

                                    ]]>
                                    https://larougetdelisle.com/blogs/sewing-with-cinnamon/heavyweight-fabrics-faux-fur-tips-and-techniques 2018-04-24T07:30:00-07:00 2023-09-02T18:15:01-07:00 Heavyweight Fabrics - Faux Fur Tips and Techniques Cinnamon Miles Hi Everyone! In part 4 we wrap up the topic looking at sewing with Faux Fur! The best part about this fabric is that you can make something relatively simple become a true statement piece! The idea of sewing with faux fur may be intimidating, but it's actually fairly easy to sew with and doesn't require you to purchase special tools. There are a few techniques tips that I'm going to share and a bunch of practical tips in the post below. I'm confident that if you take the time to follow along and practice, you will have the confidence to sew with faux fur too!

                                    More

                                    ]]>

                                    Hi Everyone! In part 4 we wrap up the topic looking at sewing with Faux Fur! The best part about this fabric is that you can make something relatively simple become a true statement piece! The idea of sewing with faux fur may be intimidating, but it's actually fairly easy to sew with and doesn't require you to purchase special tools. There are a few techniques tips that I'm going to share and a bunch of practical tips in the post below. I'm confident that if you take the time to follow along and practice, you will have the confidence to sew with faux fur too!

                                    Are you ready? Let's go...

                                    Tips For Sewing With Faux Fur:

                                    • Choose a basic pattern design. Let your fabric be the star, Intricate details would be lost in the fur pile. A simple design with just a few seams works best! No gathers, princess seams, or yokes! Stright line seams work best.
                                    • Zippers and buttonholes may prove to be challenging - especially buttonholes! If possible leave them off or substitute with fur hook, ribbon ties, or button loop toggle style closures.
                                    • Be prepared for a "fur explosion"! A lint roller, painters tape, garbage can, and large plastic bags or dropcloths are good to have on hand.
                                    • Cut faux fur from the wrong side of the fabric. Use a marking tool or tailors chalk to outline your piece in one single layer (do not fold the fabric for double thickness).
                                    • Cut through just the fabric backing being careful not to trim down the fur pile. The "pile" is the length of the fur itself. Use sharp fabric scissors, a rotary cutter is not recommended.
                                    • Pay attention to the nap or direction of the fur. Cut all piece so the nap is going in the same direction. You may want to draw an arrow on the back side of the fabric to keep track of the direction when cutting your pieces!
                                    • Shake the pieces outside or over a garbage can to remove most of the loose fur before taking it over to your machine. This will help to keep your machine clean, especially on the inside!
                                    • You can sew faux fur with a standard machine and a standard presser foot. Just run a test strip through to see if you need to adjust your stitch length or replace your needle. I've sewn with a universal 90/14 needle and it works great. Just be sure to have a fresh sharp needle on hand because it may dull quickly depending on the thickness and roughness of the fabric backing.
                                    • Tuck the fur into the seam as you pin. The fur should point in towards the garment and not extend out into the seam allowance.
                                    • If your fur is especially slippery, pin an inch or two away from the seamline to keep the fabric from shifting while you sew.
                                    • After the seam is sewn, you can use a nail, bamboo skewer, knitting needle, or pencil to carefully fluff the fabric out from the seam line if needed.
                                    • If you choose a thicker fur you may want to use the butted seam technique (illustrated in the video). When using this technique you may want to straighten a curved side seam before cutting out the pieces. This will be easier to line up and sew. It will not change the overall look too much being that fur is fluffy anyway.
                                    • Leave enough time to clean up after your project is finished! Like I mentioned cut fur has a tendency to get everywhere, floating around the room. 

                                    In the video posted below, I share with you an overview supplies and tools I recommend, share sewing tips, and demonstrate several specific techniques using the faux fur fabric. 


                                    Pattern Overview: 

                                    Liberty Jane Bomber Jacket

                                    Liberty Jane Aviator Jacket


                                      Resources:

                                      Depending on where you live, some types of fabrics may be easier to find than others. For doll size projects you can also check discount stores for items that can be repurposed, like a blanket or scarf! If you like to shop online, check out these sources for fauw fur fabric:

                                      Week One task:

                                      • Now it's time to practice! If this is your first try with faux fur, I'd suggest something simple like a basic vest. You can make one using the LJ T-Shirt pattern, just make it backward so it opens in the front. You can see an example of this idea in the post for the Swimsuit Cover Up Pattern Hack. The brown vest pictured in the video was made using that basic pattern, we just lined it and added a hood (from a pattern like the Ruched Hoodie) and added fur trim into the seamline of the hood.

                                      Bomber / Vest Pattern Hack:

                                      Curious how I turned the Bomber Jacket into a vest? I simply used the pattern pieces for the Jacket Back Lining and Jacket Front modified a few of the steps outlined below and I had a cute fur vest!

                                      • Start by creating a flat Jacket Back Lining piece (not cut on the fold). Cut Jacket Back Lining PIece (no yoke) and Jacket Front out of both fur and lining.
                                      • Cut ribbing for neck and waistband.
                                      • Sew shoulder seams and side seams of both the fur and lining pieces.

                                      • We've decided to eliminate the front placket and zipper from this design, so we need to finish the ends of the ribbing before attaching them to the neckline and waistline. With right sides together, fold the ribbing pieces in half lengthwise. Sew a straight seam along both short ends. Trim and turn ribbing right side out.

                                      • Place the ribbing along the neckline, being careful to line up the finished end 1/4" in from the CF. This will allow us to sew the center front seam and keep the ribbing free to flip up above the seamline when turned right side out.
                                      • Repeat this for the waistline seam.

                                      • With right sides together and ribbing in towards the garment, place the lining on top of the fur. Straight stitch around the perimeter edge leaving a space along the waistline open to turn the garment right side out. Do not sew the armcyes.

                                      • Trim corners and turn right side out.
                                      • Turn edges under, pin, and hand stitch the arm openings.

                                      • Hand stitch the lining opening at the waistline.


                                      ]]>
                                      https://larougetdelisle.com/blogs/sewing-with-cinnamon/elastics-tiny-waistbands-and-another-look-at-shirring 2018-03-27T07:30:00-07:00 2023-09-02T18:15:09-07:00 Elastics - Tiny Waistbands and Another Look at Shirring Cinnamon Miles Hi Everyone! In part 4 we wrap up the topic with a closer look at some of the techniques shown earlier. First, we'll look at sewing exposed elastic on tiny waistbands and then I'll show you an example using the shirring technique to create a different look for the CA Cami. The main takeaway from this post is not to be afraid to experiment with techniques and ideas and use them in existing patterns and designs! I hope you enjoy taking a more in-depth look with these hands-on videos!

                                      More

                                      ]]>
                                       

                                      Hi Everyone! In part 4 we wrap up the topic with a closer look at some of the techniques shown earlier. First, we'll look at sewing exposed elastic on tiny waistbands and then I'll show you an example using the shirring technique to create a different look for the CA Cami. The main takeaway from this post is not to be afraid to experiment with techniques and ideas and use them in existing patterns and designs! I hope you enjoy taking a more in-depth look with these hands-on videos!


                                      Pattern Overview (featured in the video):

                                      Liberty Jane Roebuck Bay Skirt 18" Dolls

                                      Liberty Jane Roebuck Bay Skirt 14.5" Dolls

                                      Liberty Jane CA Cami

                                      Liberty Jane Pattern Collection


                                        Week four task:

                                        • Pick any technique illustrated here and share a project in the Facebook group! We'd love to see what you've made!  


                                        ]]>
                                        https://larougetdelisle.com/blogs/sewing-with-cinnamon/elastics-working-with-casings 2018-03-13T07:30:00-07:00 2023-09-02T18:15:13-07:00 Elastics - Working With Casings Cinnamon Miles Hi Everyone! In part 2 we're going to take a look at working with casings. A casing is a tube created with fabric, thread, or an applied trim. When combined with elastic, it creates an adjustable fit for the garment. It can be used on a waistline, neckline, or sleeve. They are very easy to create and use!

                                        More

                                        ]]>

                                        Hi Everyone! In part 2 we're going to take a look at working with casings. A casing is a tube created with fabric, thread, or an applied trim. When combined with elastic, it creates an adjustable fit for the garment. It can be used on a waistline, neckline, or sleeve. They are very easy to create and use!

                                        In the video posted below, we'll look at creating both a folded casing and an applied casing. I'll also show you a few 'in process' examples that really change the look of the existing U.K. Holiday Top. With just a few minor tweaks to the elastic length and placement - we've got a fresh new look for Spring 2018!


                                        Pattern Overview (featured in the video):


                                        Other LJ designs that use casings:

                                        Liberty Jane Pattern Collection

                                        Liberty Jane Jeans - All sizes (Applied/folded)

                                        Liberty Jane Salina Dress - All sizes (combo folded/applied)

                                        Liberty Jane Picture Day Skirt - All sizes (folded casing)

                                        Liberty Jane Capri Pants - All sizes (casing created with grosgrain ribbon)

                                        Liberty Jane Basic Pants - bundled in the Yoga pants patterns (folded casing)

                                        Liberty Jane Mini Skirt - All sizes (folded casing)

                                        Liberty Jane Pleated Skirt - All sizes (folded casing)

                                        Liberty Jane Button Front Mini Skirt 18" AG dolls (partially folded casing)

                                        Liberty Jane Harajuku Station Skirt - All sizes (folded casing)

                                        Liberty Jane Woomera Dress 18" AG dolls


                                          Week two task:

                                          • Test it out for yourself. Create a design variation on the UK Holiday top or any other pattern you have. CAn you change the elastic placement or length to create a different look? 

                                          Next Tuesday - Week 3: FOE and Exposed Elastics

                                          ]]>