Hi Everyone! In Part 4 of Serger Basics, we wrap up the topic with a look at using the four thread overlock stitch.
In this video, Donna we will be focusing on understanding how to use the four thread overlock stitch and then contiune with our sew-along of the Savannah Skirt to practice the stitch. We will be using this stitch to give our raw edges on the over skirt a nice finish.
]]>
Hi Everyone! In Part 4 of Serger Basics, we wrap up the topic with a look at using the four thread overlock stitch.
 In this video, Donna we will be focusing on understanding how to use the four thread overlock stitch and then contiune with our sew-along of the Savannah Skirt to practice the stitch. We will be using this stitch to give our raw edges on the over skirt a nice finish.
Follow along in the video below:
In this video, we will be focusing on the four-thread overlock stitch. This stitch is often used in the garment manufacturing industry. It’s likely to be in the clothes you have on now.
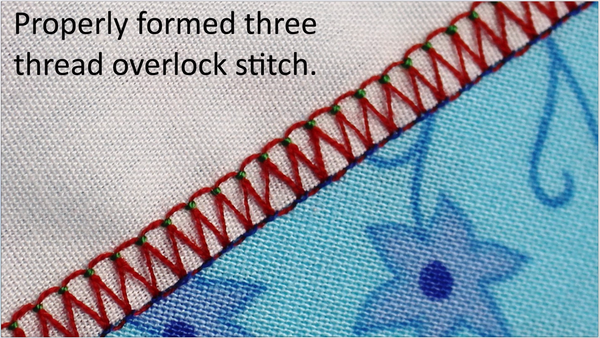
What Is the Three-Thread Overlock and Why Should I Use It?

The four-thread overlock is created using two needles and two loopers. The issues with tension and improperly formed stitches are basically the same as with the three-thread overlock, so we won’t go into detail on that again.

I did want to show you one more issue that I didn’t cover last time.
Here, you can see how the fabric is forming little twisted waves within the stitched area. That’s because there’s too much fabric within the stitch. To correct this, you’d need to make sure the wide stitch finger is engaged, reduce the cutting width, or decrease the tension on both loopers; or a combination of those adjustments.
As I mentioned in the opening video of this course, this particular stitch can be used as a seam, meaning that when two pieces of fabric are joined with this stitch, it remains stable when the fabrics are pulled to create stress on the stitch line. A three-thread stitch will often pull apart under stress, creating a little row of lines that looks like a ladder along the right side of the garment.

The way I have my machine adjusted, this stitch creates a ¼” seam line which is popular in doll clothing patterns.
You can see here how I’ve used it to sew the seams on the skirt panels of this Sweet All Around sundress. I have also used this as an edge finish where a three-thread might normally be used. When using this as an edge finish before stitching a seam, you just have to be careful about the wider stitch showing on the outside of your project.
The times I use this stitch most often are in human-sized clothing like these girl’s dresses. Here, you can see that I’ve used it to finish the edges on the 5/8” pressed open seams. I also used it to finish the facing as well as the hem line edge.
In this one, I used it to actually stitch the side seams of the dress and ruffle. In this particular example, I used the rolled edge technique to hem the ruffles and then used the four-thread overlock for the top of the ruffle in the same way we did our doll skirt ruffles.

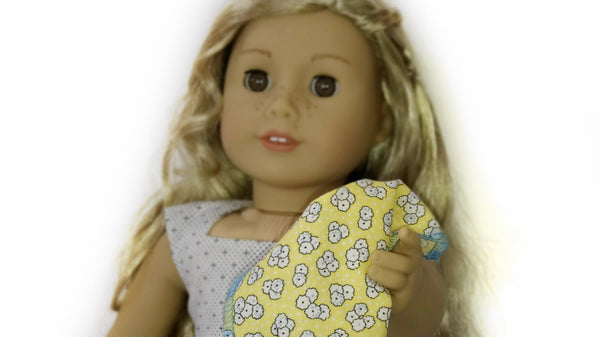
Speaking of the doll skirt, we’re going to use this stitch around the bottom of the overskirt to do a “serge and turn” style hem finish.
Serging on a curved edge can present a number of challenges. This one isn’t too bad if you go a little slower. The way this is curved, some of the edge is on the bias of the fabric which wants to stretch, so you might want to cut a few scraps to a similar shaped curve to practice on.
My best tip for serging concave curves is to disengage the blade. The issue that arises when serging curves has to do with the cutting knife being so far forward and offset from the needles.

On a particularly small curve, it may help to staystitch the curve on a conventional machine, then clip the seam allowance to the staystitching. This will allow the curved edge to straighten out a bit, making it a little less difficult to navigate the curve. Even so, it’s not an easy task.
When you are trying to serge around the outside of a circular shape, you may need to disengage the blade and concentrate on where the needles are. Some circles are almost too small to serge—like the one here on my Convergence dress. On a circle this small, you may need to use a similar technique to what you would do on a conventional machine where you sew a few stitches and then lift the presser foot to readjust the fabric. When I do this, especially with the four-thread stitch, I have the best results if I do the tiny pivots with the needles out of the fabric. Practice is the key here.
For our Savannah Skirt, I’m leaving the blade engaged because I want to trim a tiny amount at the side seams just to give it a smooth curve. You could choose to smooth the curve with scissors first and then serge without the blade.

On curved hems like this, I have the best results if I sew a row of gathering type stitches around the edge after the raw edge is serged. Then I can pull that row of stitching up to ease in the curved hem. A bit of steam pressing helps mold the hem into shape. Since I know my stitch is ¼” wide, I can use it as a guide to help keep my hem allowance even without having to do a lot of measuring.
Now we’re ready to topstitch the hem and complete the skirt according to the pattern.

One last thing before we close out this topic—the dreaded “un-serging.” I’ve seen instructions to use a seam ripper for removing serged stitching, but all the little thread pieces everywhere drive me crazy. I usually just pull on the needle thread as if I’m pulling gathering stitches. If it breaks, I work at it until I have enough to pull again. When I’ve removed the needle threads, the looper threads just come right off in long sections.
Thanks to Cinnamon and to you for the opportunity to share a little about serger basics. I hope you’ve learned something new and you’ll be confident to try some new techniques with your serger. I look forward to learning any tips you might have to share as well!
Week Four Tasks:
- Get some fabric scraps together to use with this lesson.
- Watch the “Four Thread Overslock” video posted above. There's so much more covered in the video!
- Follow along to see how to sew this technique, then practice this on your own project.
- Continue with the sew-along to sew the Savannah Skirt.
- Jump over to the SWC Facebook Group to show us what you made!
]]>
 Hi Everyone! In Part 3 of Serger Basics, Donna is joining us again as we take a look at using the three thread overlock stitch.


 Some people think of sergers as troublesome or intimidating. I see them as a great time-saver, much like the microwave in my kitchen. While I may not be able to complete all my cooking tasks in the microwave, it sure does speed up many of them. In the same way, my serger can help me produce a professional looking project in much less time. What’s so special about them? In short, a serger can be used to stitch a seam, trim the excess fabric, and finish the raw edge, all in one step.
 A serger is often referred to as an overlock machine. These loopers work together to bring the threads over the cut edge and lock them along the edge of the fabric to prevent fraying. The second difference is the cutting mechanism which trims the fabric just before the stitches are created.